1 – Customize Tfs Process Template
In the first post I showed how to download the definition of a process template into a local folder and how to open it with the Process Template Editor; in this post I’ll show you some of the very basic customizations that you can do with the PTE.
In the Methodology section you can simply change the name of the Process Template as well as including a textual description. Remember that if you do not change the name, when you upload the modified version you will overwrite the original PT, so if you are planning to create a modified version of some basic template, you need to change the name first.
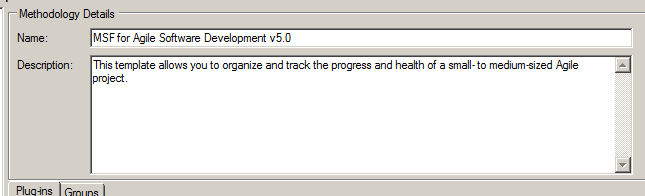
Figure 1: How to change name and description of the Template
The WorkItem section needs a more accurate series of post, so we can move on the area and Iterations where you can setup the default areas and iterations that will be created when you create a Team Project based on this Template.
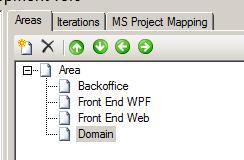
Figura 2: In the Areas and Iterations part you define default areas and iterations
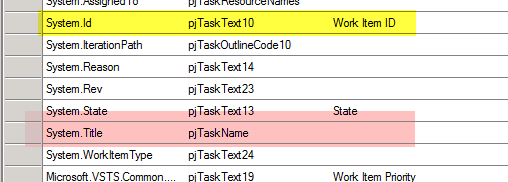
The MS Project Mapping tab permits you to define how Microsoft Project will map the various fields of the Work Items when connected to a Team Project. Configuration of this area is quite complex and you can find all the details in MSDN. In Figure 3 you can see a snapshot of the configuration of the MSF for Agile..

Figura 3: Microsoft Project Work Item mapping for MSF for Agile 5.0
Here is a brief explanation. The first column contains the reference name of a Work Item field, it is the unique name of that specific field inside TFS. The second column contains a reference to a Microsoft Project Field, with the convention that all custom field are named pjTaskTextfollowed by a unique number. As you can see in Figure 3, the System.Id is mapped to a custom field named pjTaskText10, while the System.Title is mapped to a well known project field called pjTaskName that represent the name of the WorkItem. The third column represent an header to visualize and the last column contains a unit of measure.
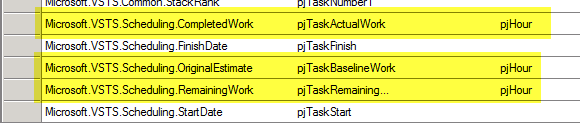
Figure 4: Unit of measure of some standard Work Item field regarding task estimation
You can see from Figure 4 that all three fields related to Work Item estimation have the value * pjHour *to instruct project that the value contained in those field represent hours. In you select a row and press the Edit button you can edit the row and you have an additional checkbox to set the field in Publish Onlymode; this will make Project never update the value from TFS.
The Groups & Permissionssection permits to setup the initial security groups for Team Projects. You can create how many groups you need, and for each one you can define the access right. Each groups has a series of allow or deny related to various area of a Team Project. This section is really important, because quite often you need to adjust security based on already established rules or names in your organization. It is highly probable that you want custom groups like developers, External Consultant and so on and doing customization for each Team Project is really annoying, it is really better to configure once for all in your customized process template.
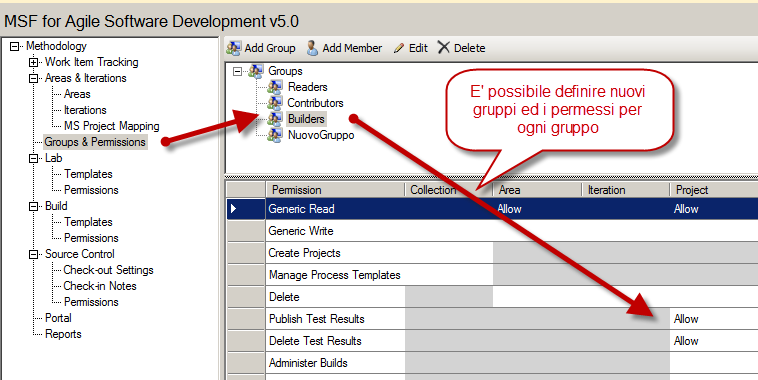
Figure 5: Management of default Security Groups for Team Project
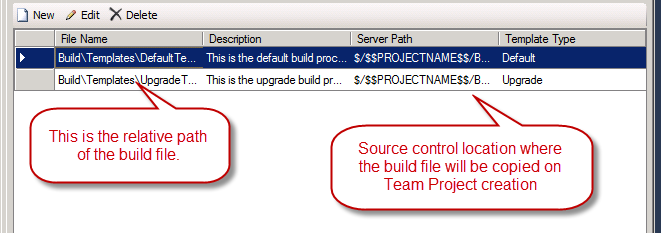
The Lab and Build sections permit to include in Process Template custom workflow for the standard builds and for Lab Management’s build. Build customization is a really cool process, you can create build specific for a Team Project, or you can use generic template to satisfy specific requirements.
To include a new workflow you should copy the file in the appropriate sub folder of the project template called Build\Templates or Lab\Templates , once you added a file in one of the aforementioned folders, you can simply press the add button, navigate to those folder and add the default template to the process. (Figure 6)

Figure 6: How to add default custom build file to Lab or Builds section.
The Source Controlsection is used to choose the initial setup of the source control, like the exclusive check-out or the automatic get latest during check-out. As an example, if you have project based on VB6 and uses MSSCCI provider, you can choose to mimic the default setting of source safe. (I strongly discouraged the use of exclusive check-out and get latest on check-out on standard project).
You can also add Check-in notes as shown in Figure 7, or setup source control related permissions in the Permissions tab.
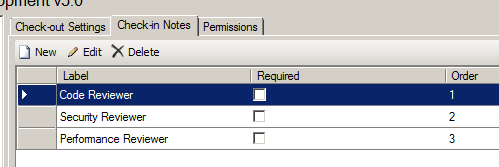
Figure 7: Modify default check-in note.
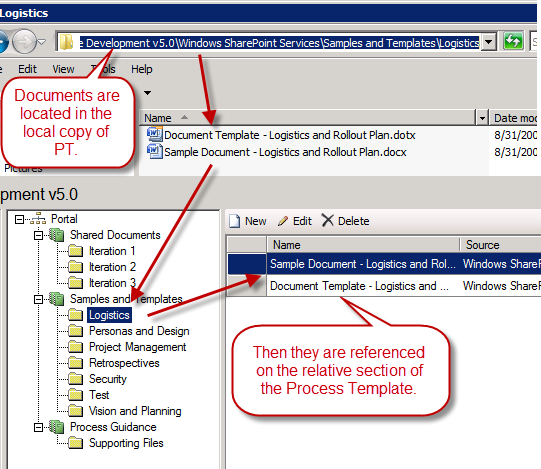
Finally the Portal and Reports sections include all documents and reports that will be create in Sharepoint and Reporting Server upon Team Project creation. As shown in Figure 8, you should insert documents in the appropriate folder on the local copy of process template
Fgiure 8: I All the base document of Sharepoint site are simply included in the process template appropriate folder and referenced in the process template definition.
alk.