1 – Customize Tfs Process Template
2 – Basic of TFS Process Template Customization
In this third part it is time to configure the definition of a Work Item. This is the most complex and more useful section of the process template that you can modify to adapt to your needs. We can modify a WI definition in two distinct way: on a local process template as explained in the previous articles and directly on a Team Process that exists on the server.
This second opportunity is useful if you need to modify the definition of a WI (Bug, Task, User Story) only for a specific Team Project and not for every Team Projects of your organization. Suppose you have a single TP for a software that interact with various types of RFID readers and you want to trace the code of the reader used when someone signal a bug. This is a very specific customization that you need to apply only to that Team Project so you do not create another Process Template, but change the WI definition in place.

You can also use this technique to validate your customization immediately: open the WI definition, modify it, press save and you can immediately test all the modifications in the Team Project. Compare it to the time needed to: modify the local version, upload the new process template, create a new Team Project based on that template and finally verify that the customization is correct.
To make all my examples on customization of Work Items I created a Team Project called WICustomization that will be used only as WI customization test. Once everything works as expected, if you want to use it in your new Team Process Template, you can download the definition as XML from WICustomization Team Process and copy to your local folder where the new Process Template resides.
To download the definition of a specific Work Item from a Team Project you use the command line tool witadmin * witadmin exportwitd /collection: ** http://localhost:8080/tfs/defaultCollect ** ion /p:TestAgile /n:Bug /f:bug.xml *
To edit a WI with the graphical editor you should open the Process Template Editor from the menu Tools->Process Editor –> WorkItemTypes->Open WIT from server (Figure 1).

Figure 1: Open a Work Item Definition directly on a live Team Project
You should choose the project collection, then the Team Project and finally the type of WI that you want to change.
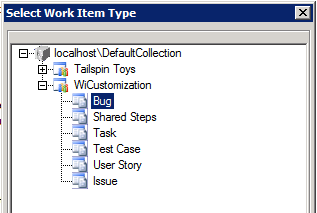
Figure 2: Simply choose the Team Project and the WI type you want to customize.
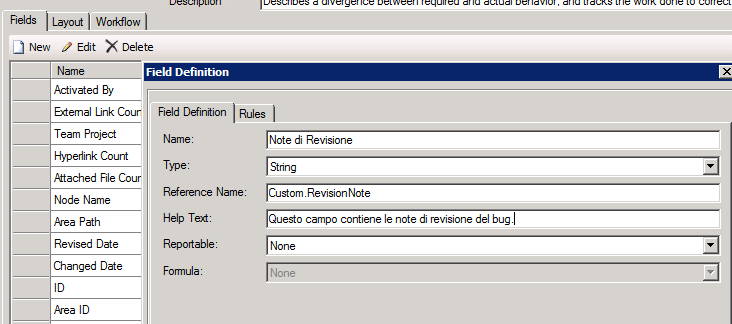
Now I want to add a field to Bug WI type called Note di revisione (revision note) that will be used to add note to a bug during the bug revision process. I can simply select the tab Fields and press the Newbutton.

Figure 3: The form to create a new Work Item field
We need to specify a descriptive name, a type and a reference name, that should be unique. The reference name will be used by TFS to reference the field. You can also add an Help Text that will be used as tooltip to help the user understand the purpose of that field. The last two parameters are used to make the field reportable; basically you can instruct TFS to move values of this field into the cube to be available for reporting.
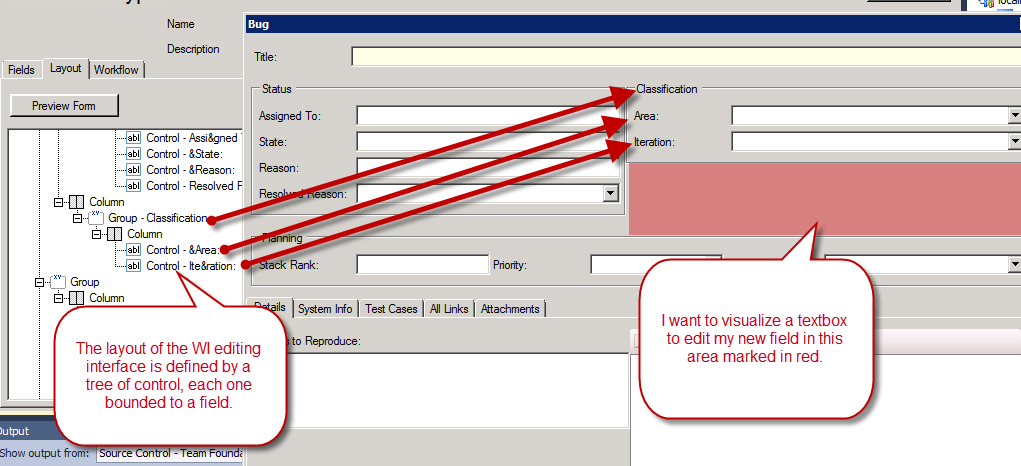
Now that I defined a new field, I need to change the interface of the WI to make it editable. In the Layout field we have a tree that represents the layout of the WI editing interface and the good part is that you can easily configure it to make your new field editable only with few clicks.
Suppose you want to insert a textbox to edit your new field in the red area of Figure 4:

Figure 4: Correspondence between the tree representation of the layout and the graphic element in the WI edit interface.
To obtain desired result we need to add another Groupwith a single Column and inside that Column a control to edit the new Field. With a Right-Click we can add another Group, place a control inside the Single column.

Figure 5: You can easily add another Group with a Control that reference the new field. As you can see the UI now has another textbox.
To allow editing you should simply specify the unique field name (Custom.RevisionNote), then the label you want for the textbox and the game is done. Now you can save the configuration, this will immediately update the definition on the team project, so you can refresh the team explorer and try to create a new Bug to verify that the field is present.

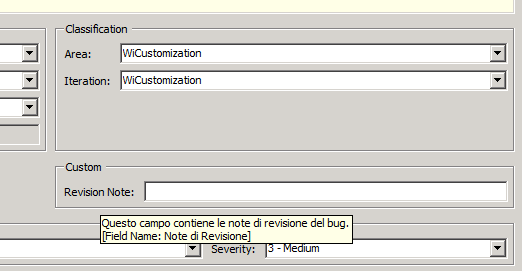
Figure 6: My new field is now editable in the Work Item Definition
As you can see the Help Text of the Field is shown as tooltip and the whole procedure is matter of few click of the mouse.
alk.
Tags: TFS