Post in the series:
Now we have all the prerequisites in place to connect to an Azure DevOps account, execute a query to grab all work items of a sprint and modifying HTML of Rich Edit fields to embed images. It is time to create a word document.
To have a better look and feel of exported document, the best approach is using the concept of Templates created by simple Word documents. With this technique we can use all the styles, formatting directly in Word, then use some placeholder to specify where you want to include fields of work Items.

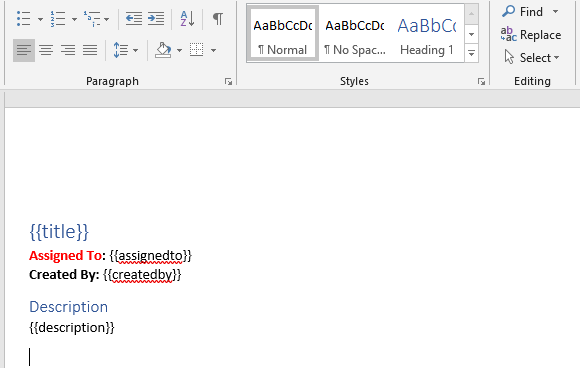
Figure 1: A simple example of a Word Template used to export content of a Work Item
As you can see from Figure 1 , a template is a simple word file where I have some special placeholder like {{title}} in the text to identify the point where I want to insert content taken from Work Items. This approach is really useful because Open XML format has a really nice feature that allows you to embed word documents inside other Word documents. This will allows me to open the template, perform substitution keeping all formatting, finally save everything to a temp file and append to the main document. With this approach I do not need to do any formatting in code, while giving the user of the tool the ability to decide the template of the output simply editing a word file.
The concept of template made extremely simple for a user to specify the formatting while keeping the code simple because it should only look for specific tokens and perform substitution.
I will really thanks Proximo S.r.L. a company I’m collaborating with for giving me the permission to share the code to manipulate Word Document , and to publish it open source. The whole code is in the example hosted in GitHub,
If take an high level look to the routine, I simply grab a reference to a list of WorkItems object, then proceed to generate a new Word Document with the help of an object called WordManipulator that contains all the routines I needs to generate a word starting from templates.
| |
WordManipulator class simply accept a name of a file, and a boolean value to specify if we need to create a new file, in this example I request for creation of a new file, then InsertWorkItem method will accept the template file and a boolean value that specify if you want to add a page break after the Work Item.
| |
As promised the routine is really simple, just create a temporary file name, copy the template file over it, then open with another instance of WordManipulator and call the SubstituteTokens function, passing a dictionary with all the fields of Work Items we want to export.
| |
For this first example I export only four fields, but what it is interesting is that use an helper class called HmlSubstitution for the WorkItem.Description field, to specify to the substitution engine that I do not want a simple text substitution but I need a piece of HTML to be inserted into the document. The helper method EmbedHtmlContent was previously discussed and it is needed only to have an HTML with all the image embedded as base64.
Thanks to the concept of templates, creating a Word Document from Work Items it is just a series of simple operations: open template, perform substitution and append to the main document.
The SubstituteTokens is a slightly more complex, because it scans all paragraphs of the document looking for keys of the substitution dictionary; when a key is found it will perform substitution using corresponding value. The code is complex because when you put a token like {{token}} inside a word file, it could be stored in XML format using more than one simple Run object (consult the ECMA for specifications). Given this premise, the code will try to find all run objects that contains the token, then perform substitution.
Even if a paragraphs seems really simple in Word, it could be saved with many Runs in OpenXml format, thus when you perform substitution you should never assume that a token will fit into an entire run.
Some of the routine are really interesting, the AppendOtherWordFile will simply append another file to the current one, and it is using the concept of the AltChunk an object in the SDK that allows me to embed one document into another. The trick about AltChunk is that it is a simple object where you can store complex data with the FeedData method, simply passing a stream as argument.
| |
The real magic is in the AddAlternativeFormatImportPart of the MainDocumentPart of the destination document, that allows you to specify the creation of a special chunk, containing a AlternativeFormatImportPartType.WorprocessingML (another word document). Thanks to this method we can create an alternate part, copying the entire content of the word document to attach and finally add this part to the original document (at the last position).
This method is so powerful that it can be used to create an alternate Import part of HTML type.
| |
OpenXML format is really fascinating and it is a real fantastic effort made by Microsoft to create a standard that is easy to use. As you can see from the above snippet, inserting HTML code inside a Word Document is done with a couple of calls.
All the rest of the code in the example is boilerplate, and here is the result of a test export. The code relating to this example is in GitHub with the tag 0.2.0. Here is an example of an exported document

Figure 2: An exported document with complex description
The original Work Item in Figure 2 was created with AIT WordToTfs tools, that allows bidirectional editing of Work Item in Word. As you can see, thanks to this tool I was able to change font in the Work Item description, and you can also verify to the Rigth that exported document maintains the formatting, and it is also using the Word template file.
Output Word Document still maintain all formatting of the template (color, bold, font etc) but also the Work Item description maintains its formatting, so the export is high fidelity.
To run this example I used this command line that allows me to specify all the information needed by the tool to export everything.
| |
Happy new Year and Happy Azure DevOps.
Gian Maria.