Release to Azure with Azure ARM templates
Thanks to new Release Management system in VSTS / TFS creating a release to your on-premise environment is really simple (I’ve described the process here). Another option is creating a test environment in Windows Azure, and if you choose this option life can be even easier.
In this example I’m using Azure as IAAS, deploying a software on a Windows Virtual Machine. While this is probably not the best approach to cloud (PAAS is surely a better approach) to create a test environment it can be perfectly acceptable.
I’m not going to give you an introduction or explanation of Azure Resource Manager because there are tons of resources on the web and Azure moves so quickly that every information I’m going to give you will probably will be old by the time I press “publish” :). The purpose of this post is giving you a general idea on how to use Azure ARM to create a release definition that automatically generates the resource in azure and deploy your software on it. My goal is using Azure ARM for DevOps and Automatic / Continuous Deployment and the first step is creating a template file that describes exactly all the Azure resource needed to host my application. Instead of starting to write such template file I start checking on GitHub becuse there are tons of template file s ready to use. As an example I took one of the simplest, called 101-vm-simple-windows. It creates a simple Windows Virtual Machine and nothing else. That template has various parameters that can allow you to specify VM Names and other properties, and it can be directly used by a Release Management definition. I’ve done simple modification to the template file and in this situation it is better to first check if everything is working as expected triggering the deploy process directly from command line.
| |
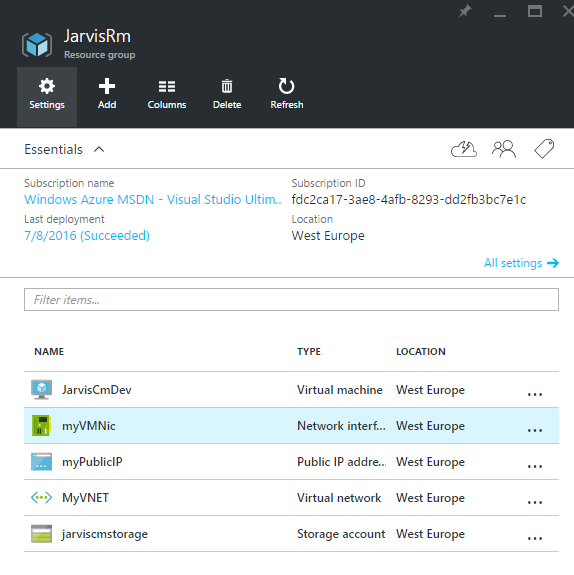
As you can see I need to choose the name of the resource group (JarvisRm) specify the template file (azuredeploy.json) and finally all the paramters of the template as if they are parameter of the PowerShell cmdlet.** Once the script finished verify that the resource group was created correctly and all the resources are suitable to deploy your software **.
 ** Figure 1: **Your Resource group was correctly created.
Once everything is correct, I deleted the JarvisRm resource group and I’m ready to use the template on a release definition.
Always test your ARM template directly from command line, to verify that everything is allright. When the resource are created try to use them as manually target of a deploy and only once everything is ok start automating with Release Management.
When you have a good template file the best place to store it is in your source control, this allow you to version this file along with the version of the code that is supposed to use it. If you do not need versioning you can simply store in a network share, but to avoid problem it is better to have Release Management Agent run the template from a local disk and not from a network share.

Figure 2: Copy template file from a network share to a local folder of the agent.
First step of the release process is copying template files from a network share to $(System.DefaultWorkingDirectory)\ARM folder so PowerShell can run against script that are placed on local disk. The second task is Azure Resource Group Deployment that uses the template to deploy all Resources to Azure.

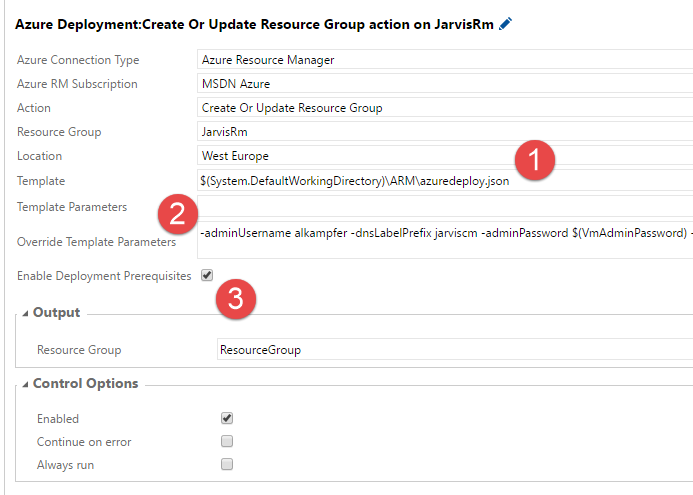
Figure 3: The Azure Deployment task is used to create a Resource Group from a Template definition.
You should specify only template file (1) and all the parameters of the template (2) such as userName, password, dns name of the VM etc. As a nice option you can choose to Enable Deployment Prerequisites (3) to have your VM being able to be used as a target for Deploy Action. You can read more about prerequisites on MSDN blog, basically when you select this action the script will configure PowerShell and other option on the target machine to being able to execute script remotely.
Virtual machines need to be configured to be used as target of deploy tasks such as remote PowerShell execution, but the Azure deployment task can take care of everything for you.
This task requires that you already connected the target Azure subscription with your VSTS account. If you never connected your TFS / VSTS account to your Azure subscription with ARM, you can follow the instruction at this link , that contains a PowerShell script that does EVERYTHING for you. Just run the script, and annotate in a safe place all the data you should insert to your TFS / VSTS instance to connect to Azure with ARM.
Antoher aspect you need to take care of, is the version of PowerShell azure tools installed in the machine where the Release Agent is running. Release Management script are tested agains specific version of Azure PowerShell tools, and since the Azure team is constantly upgrading the Tools, it coudl happen that TFS / VSTS Release Management Tasks are not compatible with the latest version of the Azure Tools.
All of these tasks are open sourced, and you can find information directly on GitHub. As an example at this link tjere are the information about the DeployAzureResourceGroup task. If you go to the bottom you can verify the PowerShell tools version suggested to run that task.

Figure 4: Supported version of AzureRM module version
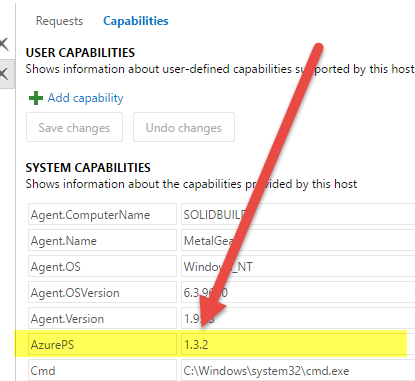
Clearly you should install a compatible version in the machine where the Agent is installed. If you are unsure if the agents has a suitable version of Azure PowerShell tools, you can go to TFS Admin page and verify capabilities of the agent directly from VSTS / TFS

Figure 5: Agent capabilities contains the version of Azure PowerShell tools installed
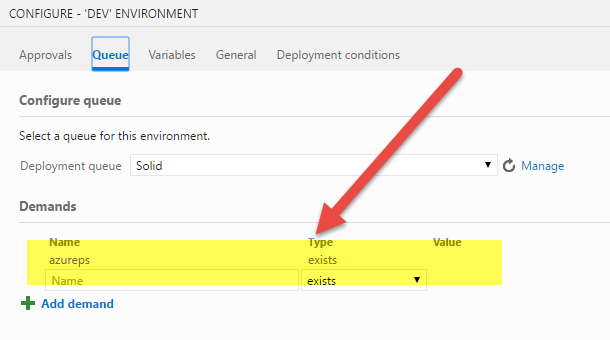
Demand for Azure PS is present on Release Definition, but it does not specify the version, so it is not guarantee that your release is going to be successful.

Figure 5: Release process has a demands for Azure PowerShell tools but not to a specific version.
As a result I had problem in setting up the Release Process because my agents has PowerShell tools version 1.4 installed, but they are not fully compatible with Release Manager Task. Downgrading the tools solved the problem.
If your release fails with strange errors (such as NullReferenceException) you need to check in GitHub the version of PowerShell tools needed to run that task and install the right version in the agent (or at least you can try to change the version until you find the most recent that works)
The Azure Resource Group Deployments takes care of everything, I’ve modified the base script to apply a specific Network Security Group to the VM but the general concept is that it configures every Azure Resource you need to use. At the end of the script you have everything you need to deploy your software (Virtual Machines, sites, databases, etc).
In my example I need only a VM, and once it is configured I can simply use Copy to Azure VM task and Execute PowerShell on Azure VM Task to release my software, as I did for my on-premise environment.

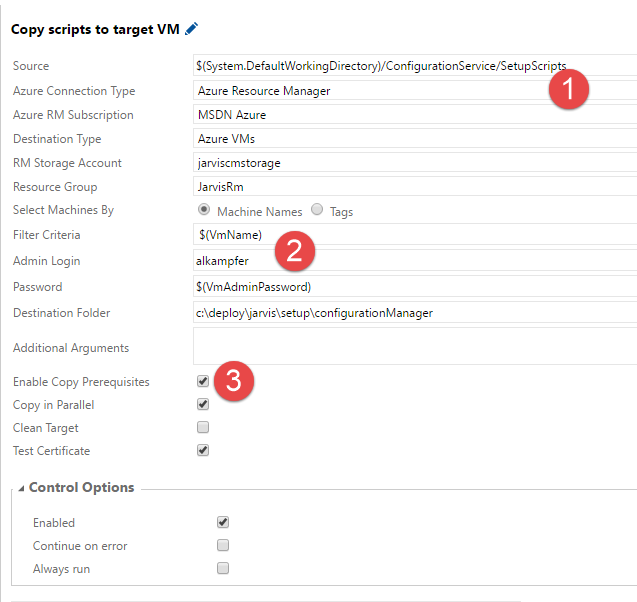
Figure 6: Configuration of the Task used to copy files to Azure VM
You can specify files you want to copy (1) login to the machine (2) and thanks to Enable Copy Prerequisites (3) option you can let the Task takes care of every step needed to allow copy file to the VM. This option is not needed if you already choosen it in the Azure Deployment task, but it can be really useful if you have a pre-existing Virtual Machine you want to use.
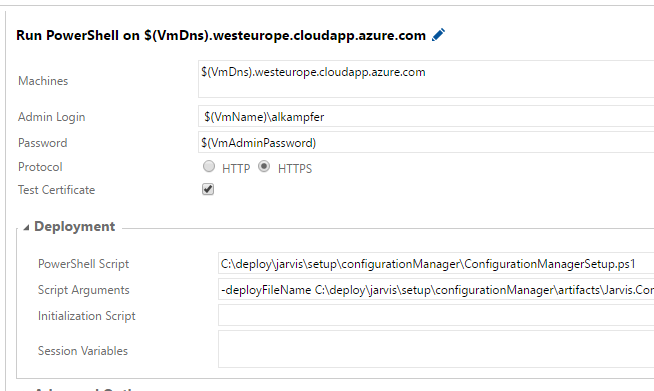
Final Step is executing the release script on target machine, and it has the same option you specify to run a script on a machine on-premise.

Figure 7: Run the installation PowerShell script on target Azure VM
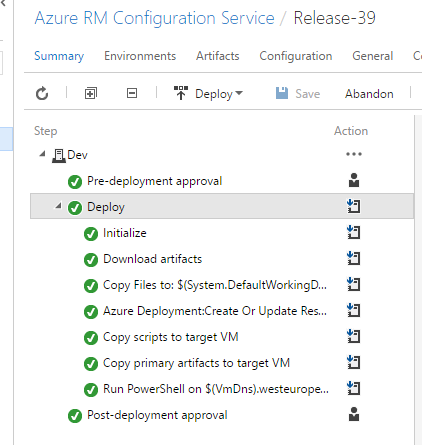
Once everything is in place you only need to create a release and wait for it to be finished.

Figure 8: Output of release definition with Azure ARM
With this example, since I’m using a Virtual Machine, deploy script is the same I used for on-premise release, with PAAS approach, usually you have a different script that target Azure specific resources (WebSites, DocumentDb, etc)
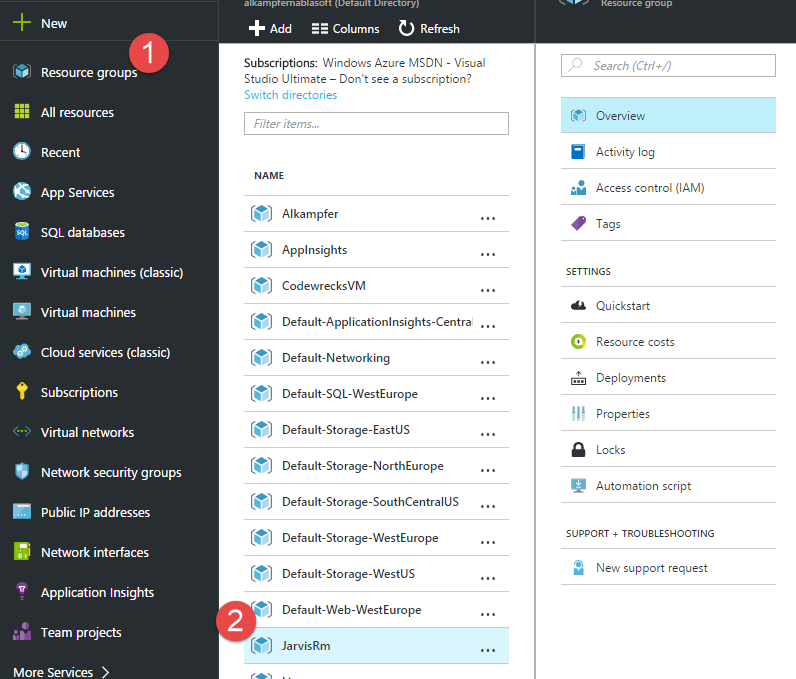
If the release succeeded you can login to portal.azure.com to verify that your new resource group was correctly created Figure 1 , and check that in the resource group there are all the expected resources Figure 9.

Figure 9: Resources created inside the group.
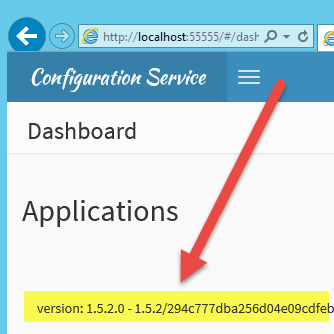
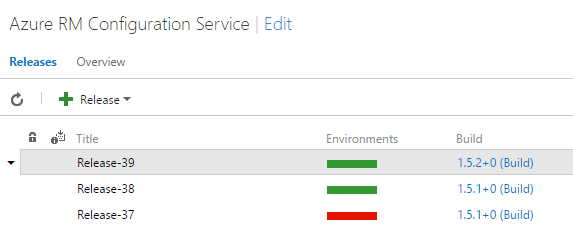
To verify that everything is ok you should check the exact version of the software that is actually deployed on the environment. From Figure 10 I can see that the release deployed the version 1.5.2.

Figure 10: List of all most recents releases.
Now I can login to the VM and try to use the software to verify that it is correctly installed and that the version installed is correct.
Figure 11: Software is correctly installed and the version corresponds to the version of the release.
Azure Resource Management is a powerful feature that can dramatically simplify releasing your software to Azure, because you can just download scripts from GitHub to automatically creates all Azure Resources needed by your application, and lets VSTS Release Management tasks takes care of everything.
Gian Maria.