Using DPAPI to encrypt password in builds suffers from a serious drawback, the password can be decrypted only by code that runs on the very same computer used to encrypt the password. You can overcome this limitation using roaming profiles, but it is not a option in many scenario. Another technique to enable multiple build servers to decrypt a password is using certificates. In PowerShell is really easy to use a certificate to encrypt/decrypt string and this article will show you how to secure a password in TFS Build definition using Certificates.
First step is generating a valid certificate, this is easy thanks to MakeCert utility, just open a Developer Command Prompt and type
MakeCert.exe -r -pe -n “CN=www.cyberpunk.local” -sky exchange -ss my -len 2048 -e 01/01/2020
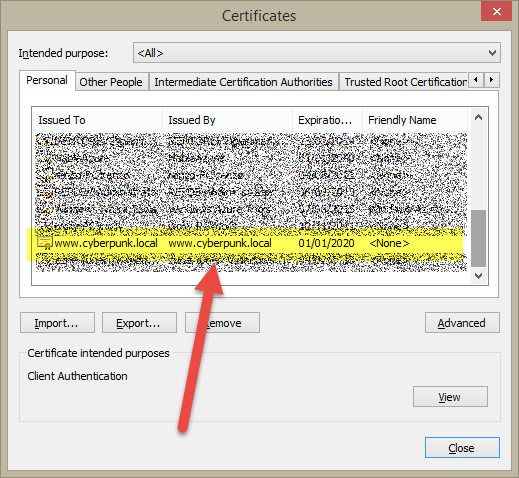
This command creates a certificate in your certificate store. To view it you should type certmgr to open the Certificates Manager Console. Your newly created certificate should now appear in the list of certificates.

Figure 1: Your newly created certificate appears in certificate store.
Double Clicking the certificate opens detail windows where you can find the value of Thumbprint property ( Figure 2 ). This property is useful because it uniquely identifies this certificate in certificate store, and it should be used to load correct certificate in PowerShell script.
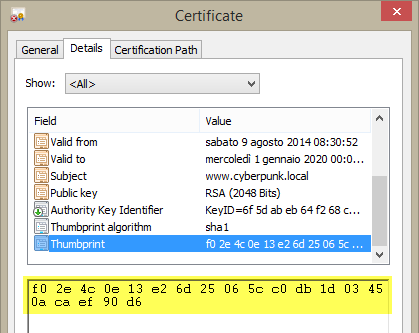
Figure 2: Grab the Thumbprint of the certificate in detail pane.
You should grab the thumbprint from the certificate details, it should be a string like: f02e4c0e13e26d25065cc0db1d03450acaef90d6. Just copy from the details pane, remove all the spaces and you are ready to use this certificate to Encrypt and Decrpyt a string. Here is the PowerShell script that uses this certificate to Encrypt and then Decrypt a string.
| |
As you can see using the certificate is straightforward, you just grab a reference to certificate with the Get-Item using the thumbprint and then it is just a matter of calling Encrypt method of the public key object stored inside the certificate and convert to Base64 to be conveniently represented as a string. To decrypt you can call Decrypt method of the Private Key object.
If you does not know how a RSA key pair works, here is the basic concept. The certificate contains two keys, one is the Public Key, and the other is the Private Key. You use the public key to encrypt a string and the resulting encrypted string can be decrypted only by the Private Key. Public key used to encrypt the string cannot be used to decrypt it. This is the reason why RSA is called an Asymmetric Algorithm.
Now return to the Certificate manager, and press “Export” button to export the certificate, choose to export only the public key, choose DER format and export the certificate to a folder of your computer. Then press “Export” again but now choose to export the private key , choose the PKCS format and then use a password to protect the exported file. A password is required because the private key is the information that you need to keep secure from the eyes of the public. Now you should have two exported files, one with.cer extension that contains only the public key, the other with.pfx extension containing also the private key.
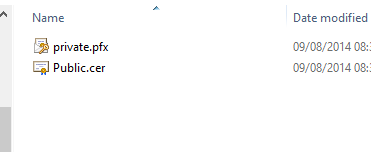
Figure 3: Exported certificates in my filesystem.
Now remove the certificate from Certificate Manager, and try to run again the script to encrypt and decrypt the string, you should now receive an error from Get-Item, telling you that the required path does not exists. This confirms that the certificate was removed from your certificate store. Now press the “import” button on Certificate Manager and import the previously exported public key, the file public.cer in my example and run the script again to verify that you are able to encrypt a string but you cannot decrypt, because you have only the public key. 
Figure 4: Now that you have only the public key, you are able only to encrypt and you could not decrypt anymore the string.
To verify that you can decrypt password using Private Key, press Import button again on the Certificate Store and import the Private.pfx certificate. You will be prompted to enter the password you use during the export, and if you look at the options you can verify that there is an important option called “mark this key as exportable”, that is turned off by default.
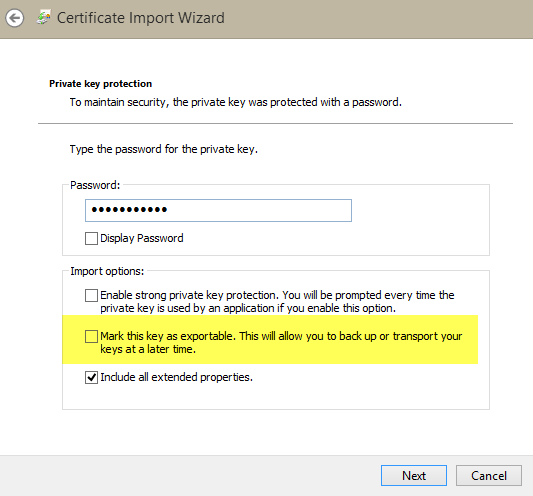
Figure 5: Importing a certificate with Private key in certificate store
This option is really important, because this prevents users to further export the private key to another computer. Once you imported the Private certificate, you can verify that pressing the Export button does not permit you to choose the option to export the Private Key. Once the certificate with private key is imported you are now able to decrypt the password.
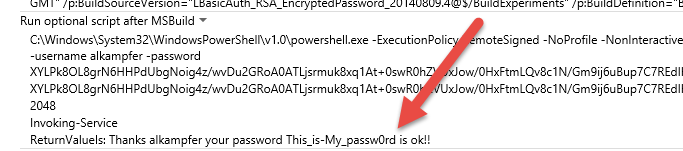
Thanks to asymmetric key you can simply * store the certificate with the public key in any network share, everyone can access the certificate, install it and securely encrypt a password because only people with the private key can decrypt it. Now you should login in every Build Machine with credential of TfsBuild, and import the certificate with the Private key to personal certificate store *, do not mark the key as exportable. Now you can use Certificates instead of DPAPI to encrypt and decrypt password during the build. This script will work in every build server where you have installed the certificate for the user TfsBuidl. Here is the script.
| |
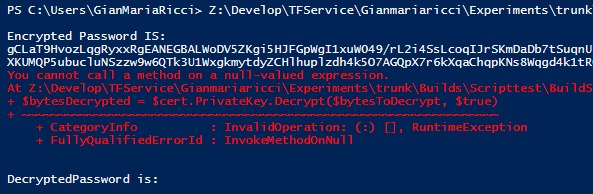
This script simply decrypt the password and call a simple REST service just to verify that the password was decrypted with success. Here is the output of the build.
I want to remember again that this technique does not secure the password for people that can schedule a new build in TFS. Any person that can schedule a new build can create a PowerShell script that decrypt a password and print it in build output, grab an encrypted password from another build definition and let this script decrypt it.
This is the same technique I used with the above script where I dump the password in clear format in Build output, just to verify that decryption is ok. Any other user with permission to schedule a build could have scheduled a build running a similar script to decrypt password store by other people.
Gian Maria.
Related Articles