To fully understand this article you need to read previous articles of the series
- Deploy on Azure Web Sites from on-premise TFS
- Deploy Asp.net web site on IIS from TFS Build
- Manage Test Data in Visual Studio Database Project
In those articles I’ve explained how you can automatically publish your web site to a standard IIS hosted web site or to an Azure Web Site. The cool part is that you just need to add extra MsBuild arguments to TFS Build process definition and the game is done. For Azure Web Sites you also have a dedicated template for publishing that will also manage an integration with the Azure Web site dashboard (as you can see in the following figure)

Figure 1: Azure web site deployments tab
If you use the standard DefaultTemplate workflow (with MsBuild arguments) Deployments Tab will not be populated, but you can use it to also deploy TF Service project that uses Git (actually not supported by the standard azure deploy template).
But the main question is: why I should care of creating a structure for Automatic Deploy and where are the Benefits?
One of the main purpose of Continuous Deployment is to deploy to test environment and execute a series of integration test to find problems as soon as possible. The goal is:
- Fail as early as possible *
Even if your team is committed to Unit Testing, we all know that many problems arise from wrong deployment, wrong configuration files in production, bug with production data and so on. All these problems cannot be addressed by standard Unit Testing, and there is the need for a suite of Integration tests, that exercise the whole software deployed to an environment. Another reason is: some of the errors we discovered in production are related to manual deploy. People can make errors, especially if: deploy is a task that is done infrequently, it is poor documented and it is a real boring process (bored people tend to have less attention). The most common situation of failure is new undocumented configuration created by developers; the symptom is: you follow all the instructions of deploy document, but a section of the software is failing for apparently no reason. After a little bit of investigation you will find that some new settings introduced a couple of months ago is misconfigured (including calling developers in the night to understand what went wrong)
In this scenario the first advantage of an Automatic Deployment environment is: engineering team is forced to maintain automatic deployment scripts healthy. When it is time to deploy in production, operations team can use the same automatic procedure to minimize deploy errors. Another advantage of automatic deployment is detailed log of every operation done from the scriptsthat allows you to diagnose problems quickly.
One key part of the process is automatic validation of deploy , where the focus is: spotting as much errors as possible with automatic procedures. Having a good set of integration test, capable of validating a deploy, can save a lot of time and also give to the whole team a good confidence on the deploy process so they can deploy often.
This is a simple scenario: Asp.net application with a Sql Server Database.
Thanks to Sql Server database project, it is easy to automate the creation / upgrade of database schema, as well as preloading some test data to being able to do some test after the deploy. If you do not use database project, or if you want to run integration test against some production data, the team should maintain a backup of a dedicated test database and you should personalize build deployment scripts, to automatically restore databases from well-known backup after the deploy of the web site.
Apart from technique used to manage test databases, you will need to exercise deployed software and with Web Site one of the best solution is using Visual Studio Web Performance tests. A Web Performance Test is meant to be used in load test, but it contains also assertion and rules to verify that the site is responding as expected. Another interesting aspect of Web Performance Tests is that they can be run with a standard MsTest runner, so you need no personalization of the TFS Build script to run them after an automatic deploy. Moreover it is a recording of HTTP calls and can be performed without the need of an UI. The drawback of this technique is that he does not run javascript code. If your site has a lot of javascript code you should use different technique, like Coded UI Test.
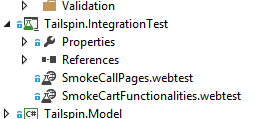
I’ve started this demo creating a couple of WPT.

Figure 2: A couple of Web Performance Tests in a integration test project
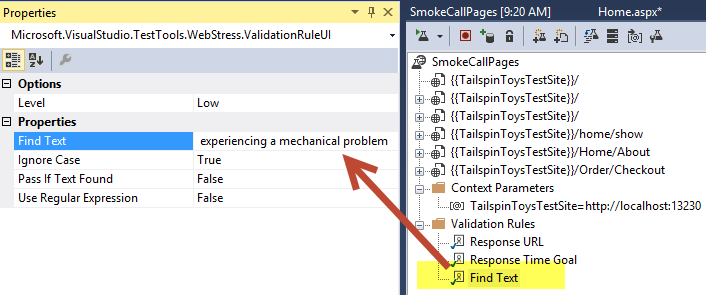
The SmokeCallPages is a simple test that basically click on every page of the site , thanks to the IE recorder plugin, recording such a test is really simple. Once recorded you should add some assertion, in production configuration I have CustomErrors=”on” in the web.config file, so even if the site raise some exception, the user is redirected to a standard page with a warning “we are experiencing some mechanical problem”. This will lead to adding a rule that fail test if the HTML of the page contains this string. The rule is then applied to each response of the Test.

Figure 3: A validation rule that makes the test fails if a certain string is contained in the HTML.
You can write complex tests, you can create base web performance tests that performs login and use them to create a series of tests that exercise private part of the site, write plugins and many other features. Once tests are finished, you should parameterize web sites, as you can see in Figure 3 , where the url of the site to test is {{TailspinToysTestSite}} and not a real address. Everything enclosed in {{ }} is a context parameter, in test definition its value is set to http://localhost:13230 , but it can be changed with Environment variables. If you setup an environment variable for the computer called * Test. *TailspinToysTestSite (name of your context parameter prefixed by Test.) it will override the value stored in the test.
Once everything is in place, I use a Build Agent inside a Virtual Machine, (where I’ve set the Test.TailspinToysTestSite environment variable to point to my Azure Test Site), then I configured a standard tfs build , added right MsBuild arguments to deploy web site and finally I specified the integration tests to run.
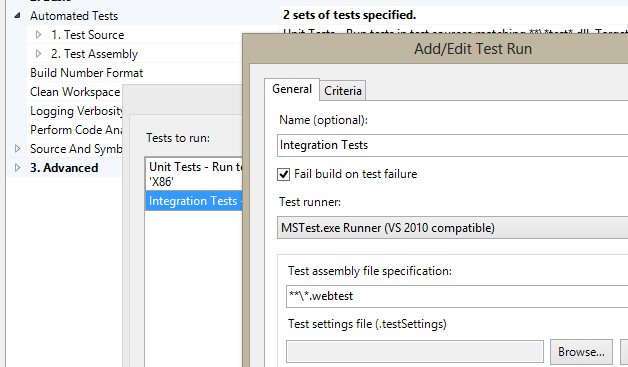
Figure 4: Configuring integration test to be run during the build
All you need to do is going to Automated Tests Section. He you will find a standard test run configuration that runs all tests that are in assemblies that contains the word “test” in it. If you execute the build you will find that the integration tests will not execute, this because TFS 2012 has a new agile test runner that is not capable of running Web Performance Test. The solution is adding another test run, specify MSTest.exe runner (VS2010 compatible) as the Test Runner and changing the Test Assmbly file specification to run everything that has an extension of.webtest ( Figure 4 ). Now you have two distinct test configuration.

Figure 5: The two test runs specified in the build.
I also set to true the Fail Build on Test Failure parameter , because I can tolerate a standard unit test failing, but if a single integration test fails it means that something basic is broken in the deploy and I want to react immediately. Since all test results are automatically pushed to TFS it is simple to understand the reason of a failure as you can see in the following build Summary.

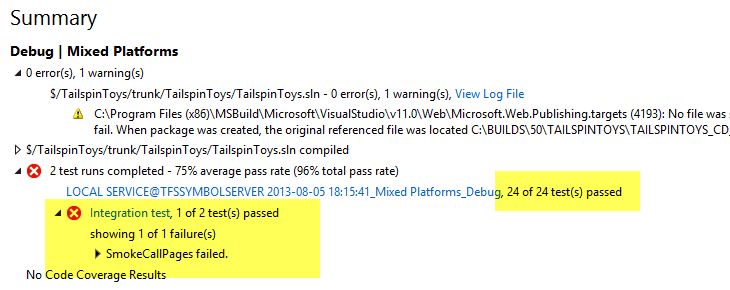
Figure 6: Build summary contains all test run information
There are two distinct test runs, the first one is using the standard agile test runner and runs standard unit test, it is then followed by the results of integration testing. The nice aspect of build summary is that it shows immediately the name of the test that is failing (SmokeCallPages ) , the whole test result can also downloaded locally to better identify the cause of the problem.

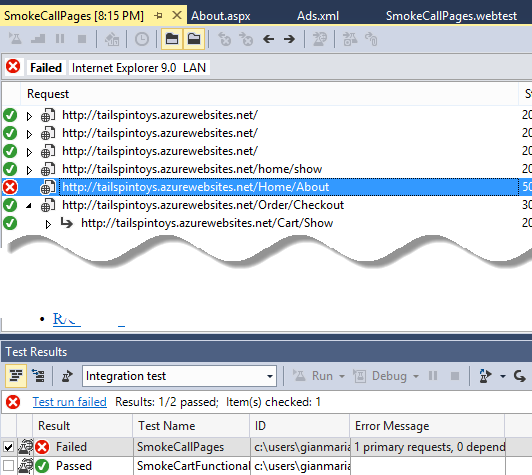
Figure 7: Test results can be downloaded locally to examine the root cause of the problem and the exact request that is failing.
From test result you can spot immediately the request that failed and if you have some form of logging enabled, like Elmah, you can have a better clue on what is happened simply looking at log page. Test Results contains also a lot of information like full request and full response, so dev team can insert some diagnostic information in the page response visible only when the site is deployed in Test environment (like an hiddenfield with the full exception error or some internal error code). Even if you do not use such technique, Elmah can give at least full exception details in a dedicated web page.

Figure 8: Elmah handler is showing the error.
Thanks to this simple Build / Deploy / Integration Test workflow integration errors are immediately spotted during developing cycle. The more integration tests are written by the team, the more bugs are discovered automatically so the team can immediately react and fix them. Having integration Tests allows also to spot builds that are good to send to the Test Team, because it is not worthy to waste time of your Test Team into testing a really bugged build.
In this example the problem was a malformed XML file that contains the “About Us” text (easy spotted by the elmah log), now the team can fix Xml file, verify the fix running the integration test that failed locally and finally check-in the code. The next build run will verify if everything is good.
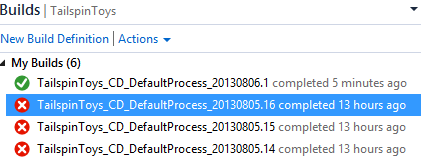
Figure 9: Check-in fixed the problem, the build is now green.
The cool part of Integration Tests with Web Performance Tests is that you can download test results even for green build to gather metrics: see page timing, response size, etc.

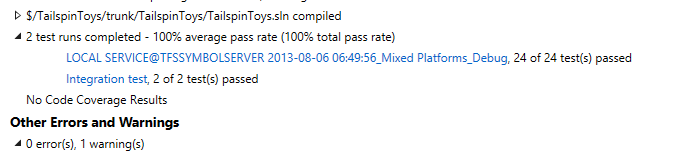
Figure 10: Build summary shows all test passed.
Remember that with Web Performance Test you can create assertion on response size, response time and write plugin to verify whatever you want, so they are a real powerful tool in your toolset to test your Web Application.
Gian Maria