Customizing process template is a real cool part of Team Foundation Server, because it permits you to follow the “ do not adapt your process to the tool but adapt the tool to your process ” scenario. There are a lot of best practices and a really good guide published by TFS Rangers, in this post I want to show how you can use a PowerShell script in a Tfs2013 Build to automatically update your Template at each push of a new definition.
First of all, whenever you customize a process template you should always store your modified process in source control , because this is the only way to track down exactly what you have changed and gives you the whole history of the customization. This is especially useful if, upgrading to a new version to TFS, the automatic process upgrade does not work and you need to reapply all your customization to the new process.
To create this demo I created a Team Project called PtCustomization based on Git repository (support for git is new in TFS 2013). The process template of the Team Project is Scrum and the first step is downloading the actual process template in a folder where I’ve cloned the repository. After the first download I immediately commit everything, so I have the original version of the template as the first commit. The next step is creating a couple of helper files
- A powershell script that will upload all Work Item Definition to a specific Team Project
- A personalized build to simply run a Script during a TFS build
The first file is a powershell script that will upload process template customization to the PtCustomization Team Project. Having such a script makes customization really simpler: modify the process template, run the script and the Team Project immediately reflects the modifications. Here is the script
| |
The script is really simple, it just define location of the Project Collection and the name of the Team Project, then enumerate all Work Item Definition and call Witadmin importwitd for every definition, then it imports also categories and process config.
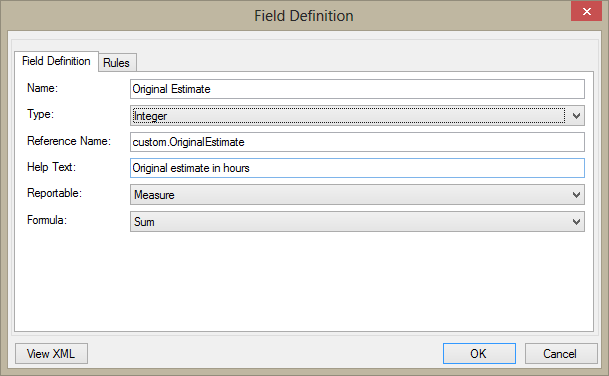
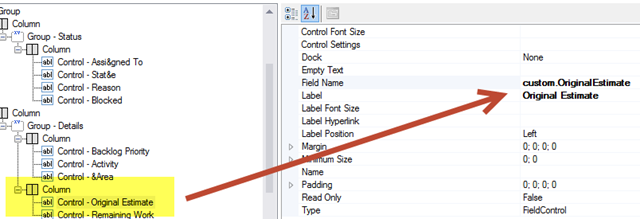
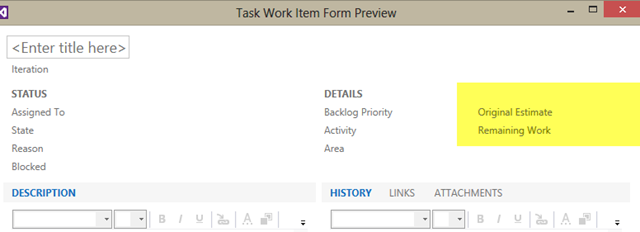
To test the process I’ve modified definition of Task Work Item, adding another field called Original Estimate (I know that is really not Scrum like, but many people likes to have this kind of information) and modify the layout of the Work Item to actually show this new Field.

Figure 1: Adding a new Field Definition to store Original Estimate
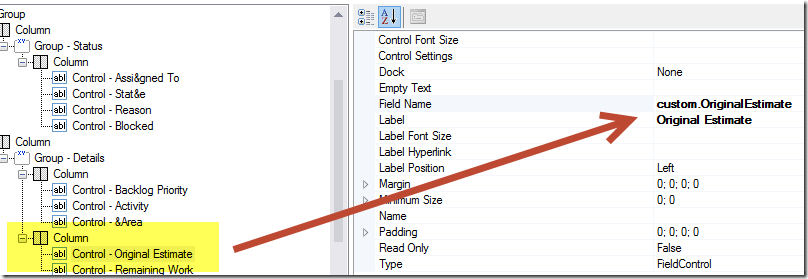
Figure 2: Adding the new field in the Ui layout
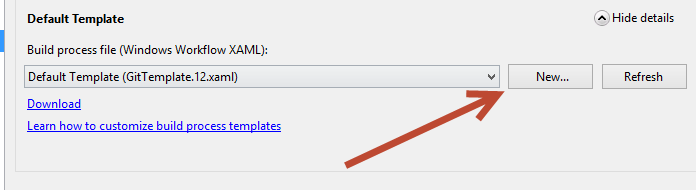
Then I’ve created a custom build definition to run powershell uploader script during a Team Project Build. The script was created simply using the Default.xaml template for Git Project, removing all the compile and test part, leaving only the Clone part and adding a Run Script task. Basically this build does nothing that getting source and running a script. To use a custom script, you can simply commit in git source, push to the server and choose it pressing New in the Process Section of the build.

Figure 3: Change the template used for the build to use your customized process
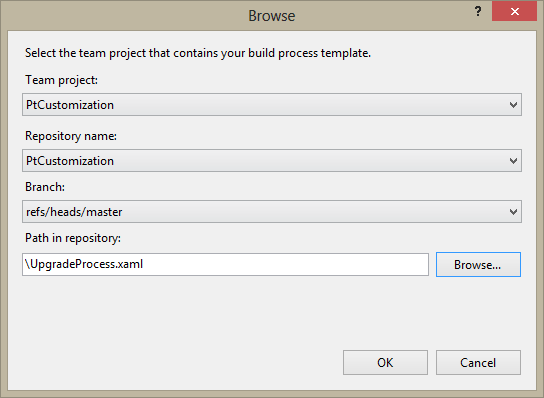
Figure 4: You should simply browse your local repository and choose the file after you’ve pushed it to the server
Now you should be sure that the account used to run the build server has enough right to customize a process template, or you will get an error
TF237113: You don’t have enough permissions to complete the import operation.
during the build. To accomplish this you should open TFS Administration console, choose the Project Collection that contains your project and be sure that the account you are using or the Right Group has the Manage Process Template right
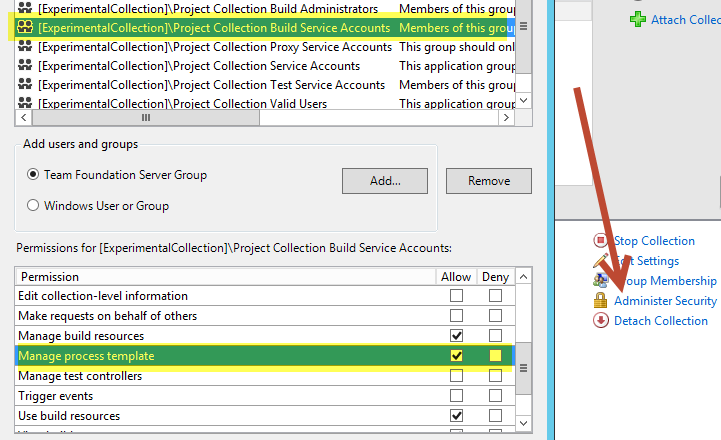
Figure 5: Give Manage Process Template Rights to the right group or to the user that runs the build agent
Now everything you need to do is configuring a build, choose the Script to run and the game is done, just push modification to the server and the Process Template will be automatically uploaded for you.

Figure 6: Final configuration of the process.

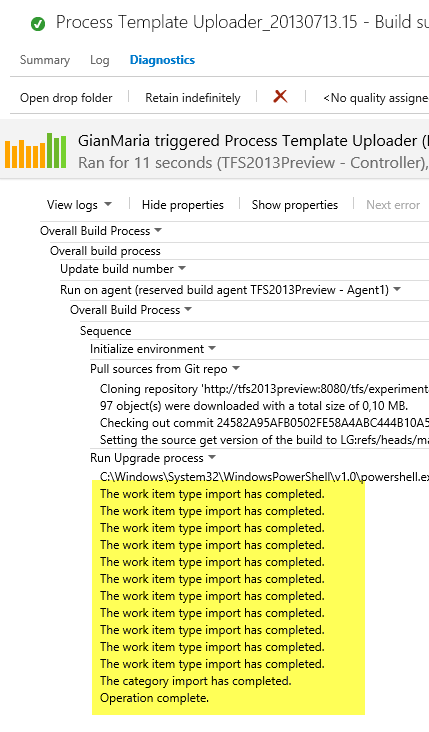
Figure 7: Full log of the build, output of witadmin importwitd are visible into the log.
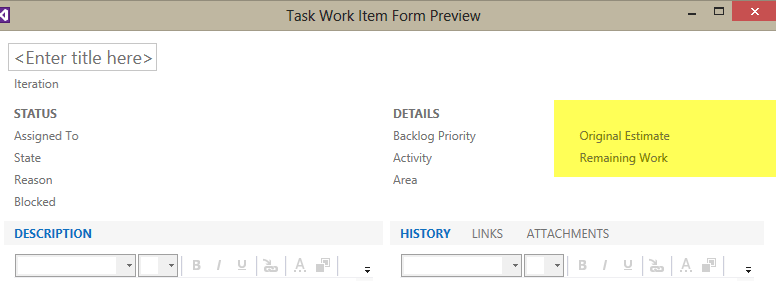
Figure 8: Once the build is complete Process Template is automatically updated
The advantage of using Git as source control comes in hand when it is time to manage updating production Team Projects. In this scenario the PtCustomization Team Project has the main purpose to testing Process Template customization and is not used for anything else than managing this customization. Thanks to the continuous integration each push will upgrade the Template to immediately being able to test new customization, but at a certain point you should start to manage deploying those customization to real production Team Projects.
Thanks to git builds this process is really simple, suppose you have a Team Project called ProductionProjectA and you want to apply the new modified process to it. The first step is creating a Branch of the customization you’ve done.

Figure 9: Create a branch of the PtCustomization repository, and give it the same name of the Team Project you want to upgrade
Then you switch to that branch and edit the powershell script changing the name of the Team Project that will be updated. Then commit and push everything to the server.
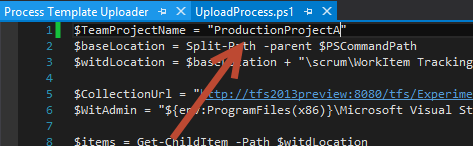
Figure 10: Change the powershell script of the branch to point to the Team Project you want to upgrade
Finally change the build definition to monitor the new branch for continuous integration.
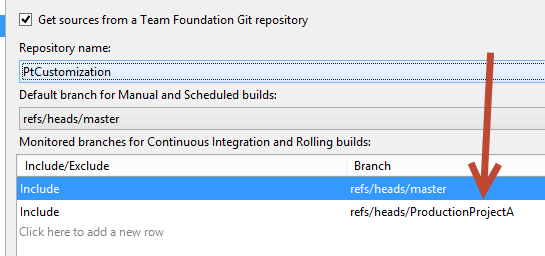
Figure 11: Configure the build so it will trigger an automatic build whenever there is a push on master or ProductionProjectA branch
Now if you issue another push into the ProductionProjectA branch, the process template of corresponding Team Project will be upgraded atuomatically. This is a great way to proceed, because you can try customization on Master branch, and once the customization is stable, you can automatically updates other Team Project doing a simple merge and push of the modification to the corresponding branch.
In this example I’ve created a new branch to manage updating of a single Team Project, but noone prevents you to change the script to run for multiple Team Projects. You can create a branch called Production, and change the script to upgrade all of your production Team Project. In this scenario whenever you will push into the Production branch multiple Team Project will be updated.
You can finally use TFS API to enumerate Team Projects of an entire collection, and you can create a branch of the customization for each Project Collection, so whenever you push on it, all Team Project of an entire Project Collection will be updated. This scenario is much more risky, because you should be sure that all Team Project of the collection are using the same base template.
You can download Powershell script and the customized build here.
Gian Maria.