Windows Azure Web sites has a lot of options to automatically deploy web sites, but if you have desktop application deployed with click-once you have nothing out of the box to do continuous deployment in Windows Azure. Lets see how solve this problem.
Deploying on Windows Azure Blob Storage
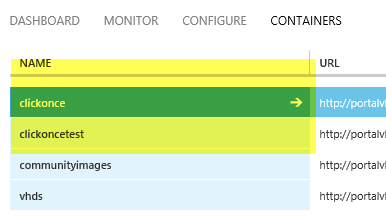
To deploy Click Once applications on Windows azure, the simplest solution is using a Blob Container. All you need to do is creating new public Blob Container and copy inside the blob the result of a Click Once publication.

Figure 1: Create a public container to store blobs in Windows Azure.
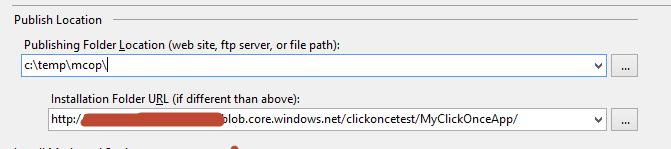
Now you should configure everything on Visual Studio to deploy the application, the key part is using two different values for Publishing Folder Location and Installation Folder Url.

Figure 2: Configure publishing location for your project.
The first value should point to a local folder in your HD, but the Installation Folder URL must point to newly created Blob storage Container. Remember not to specify the root of the Container and use a subdirectory instead (MyClickOnceApp in Figure 2) so you can use a single container to deploy multiple Click Once applications.
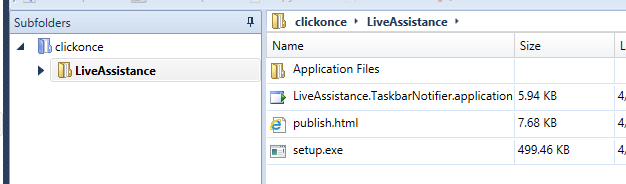
Once publish is complete all you need to do is moving all files in blob storage, personally I use Cerebrata Cloud Storage Studio: simply drag and drop files inside the blob, press Upload and the application is live and ready to be installed!!

Figure 3: Click-Once file are now uploaded in Blob Container
If you let Visual Studio generate a publish.html file for you you can simply give to people the address of the publish.html file in your Blob, if you do not want to have publish.html, you can simply give people the address of setup.exe , it is enough to download it and installing everything

Figure 4: Click-once publish page is publicly available from your Blob Container
Automate the process of Local Publish
This process is really simple but to achieve continuous deployment it needs to be automated; so it can be executed by a script. The simplest solution is building a Console Application in C# to automate the whole process to obtain Azure Blob Container publishing from command line. This utility is composed by two main parts: local publish and Blob Container uploading.
Publishing a project with Click Once is just a matter of calling publish action with Msbuild.exe, but there are.NET classes that can be used to do everything with code; they are contained in Microsoft.Build assembly and you can use them to build a project programmatically with.NET code. Here is the sample
| |
First step is creating a Dictionary to hold all project properties that needs to be overridden : Version, Configuration and Azure Blob Storage (PublishUrl InstallUrl and update Url). This will execute the build with different parameters as if you had changed the options inside Visual Studio. Thanks to the ProjectCollection you can load a Visual Studio project given its name, call a full rebuild followed by a publish task and the application is published locally. To simplify debugging the utility will create a log file in the same location of the project file that will contain all the output of the build, it is really useful if the publish went wrong and you want to know why.
After the publish, you can find all Click Once file stored in a subfolder of project output folder called app.publish. If configuration is debug it is bin\debug\app.publish if Release is used files are located in bin\release\app.publish.
Automate the process of uploading Click-Once folder to Azure Blob Storage
The utility needs a second class to upload a local folder to an Azure Blob Storage. Thanks to azure SDK, this task can be accomplished with few lines of code.
| |
Just start from the name of the physical directory and the corresponding CloudBlobDirectory that represent the target of the copy operation. Then it is just a matter of enumerating files with GetFiles and upload every file to the Blob Container, then enumerate directories and recursively call the function to upload every subdirectory automatically.
The resulting utility can automatically publish a Click Once application to Azure Blob Container from command line.
| |
The caller should specify all parameters: project to deploy, version number to use, name of the application and finally address of the Blob Container and related connection string. Thanks to this command line utility, automating the deploy of a Click Once application is really easy.. The only differences from standard publish dome with Visual Studio wizard are - There is no concept of Automatic Increment Revision with each publish
- There is no automatic generation of a publish.html file
The first problem is a No-Problem, because with continuous deployment usually version number is automatically generated by the build machine and is specified generally from the build script. Second problem is another No-Problem; once application is deployed you can simply give to people direct link to the Setup.Exe program, after all the publish.html file is just a matter of convenience.
Continuous Click Once deployment with Team Foundation Server Build
This command line utility supports placeholder for VersionNumber; it is in fact possible to use J that will be substituted by 5 digit Julian number (YYDDD where DDD is the number of days since beginning of year) and B that will be substituted with the TFS Build incremental number (but you have to supply build name with parameter). To specify the number of the build you should use the /BuildNumber parameter,
/BuildNumber :MyClickOnceApp_20130419.13
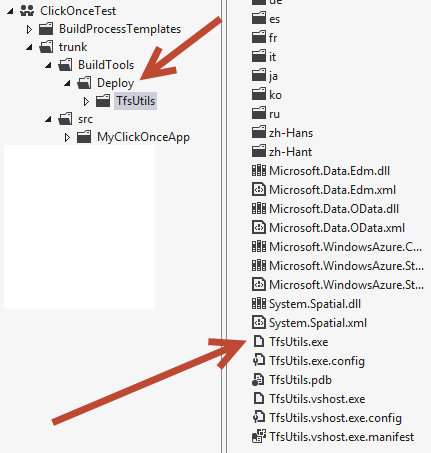
Now you can specify VersionNumber as * X.X.J.B *, where Major and Minor are fixed value (Es. 1.3.J.B), and J and B will be automatically generated to have an unique incremental Click Once number for each Build. The first step to create the build is storing the Command Line utility inside a folder of source control.

Figure 5: Command Line utility is checked in with the code
The reason is simplify build customization: the build controller downloads all files from source control during the build and if you store utilities in source control you will have them downloaded automatically from the agent. The process of build customization is really similar to the one used to Deploy a Database Project during an Azure Web Site deployment , and it is simply based on these steps
- Add all required parameters with related metadata on the workflow
- Locate where the TfsUtil.exe and project to build are on disk
- Add an InvokeProcess activity to invoke TfsUtil.exe with correct parameters
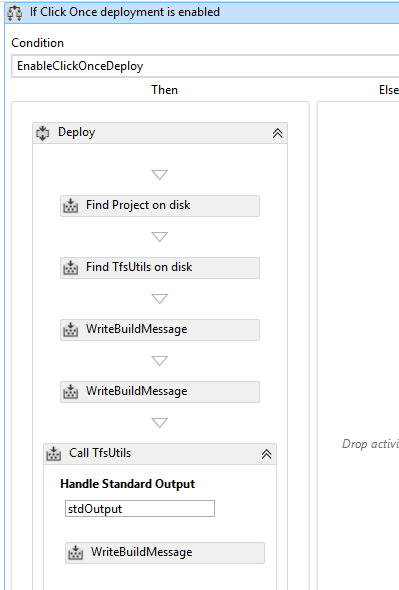
Here is the sequence added to the standard build workflow.

Figure 6: Sequence of actions needed to call TfsUtils utility
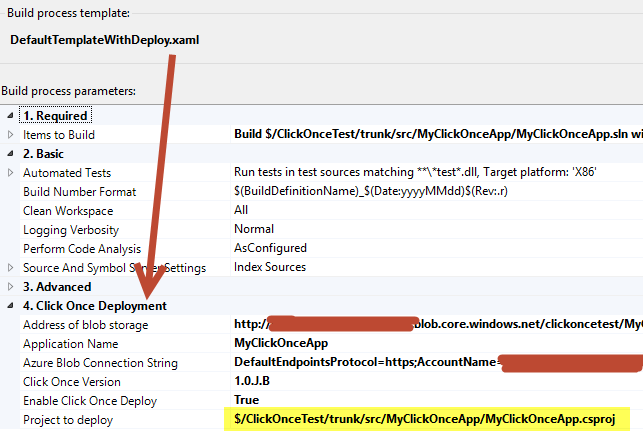
Now it is possible to choose this new Workflow, specify all the parameters needed to deploy and launch the build to have Click Once application automatically published.

Figure 7: Definition of the build for Click Once continuous deployment.
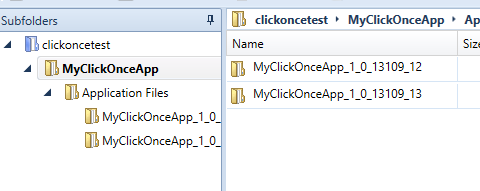
If the build is configured to run at each check-in Click Once continuous deployment on Windows Azure Blob Container is achieved. If the build is configured with manual trigger the user can decide when and which check-in to deploy, all the process is automatic. We achieved continuous deployment of the click-once application in Azure. Once the build finished you can check if everything is ok looking for files in Blob Container.

Figure 8: Files automatically deployed from TFS Build.
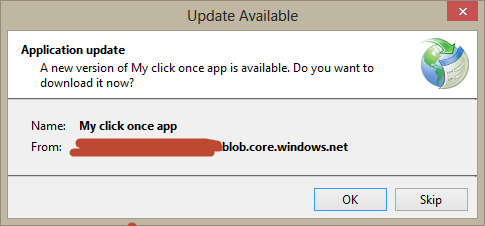
The really nice part of having Continuous Deployment is enabling Click Once automatic check for update , once tester and end users installed the application the first time, it will automatically check at each startup (or shutdown) if there are newer version available. To release update to tester or end users, you can simply check-in the code, wait for the build to finish, and Voilà!!!!!! All of your clients will be notified of the new version. Since TFS Build runs also automated test, you can configure the build to fail if tests failed, so nothing gets deployed if someone broken some Unit Test.

Figure 9: New version were deployed automatically from TFS Build
Some further consideration of extending TFS Build with command line utility
Some friends asked me why I’ve created a command line utility and not a Workflow Custom Activity, to customize TFS Build. I want to explain why I prefer this approach over the other.
Simpler development and testing: Deploying a console based command line utility is really simple, quick and easy to debug and test, while a Custom Workflow Activity requires a little bit of attention and it is more painful to debug and test.
Reusable outside TFS: A Workflow Activity can be used only in a Workflow, while a Command Line utility can be used from PowerShell, Nant, or even a simple batch file, making the utility much more reusable.
Simpler debug and deploy for TFS: Check-in the command line utility in source control and you are done, build agent will download it for free during the build. If something goes wrong with the build and errors occurred, in workflow logs there is the exact command line that was issued. I strongly suggest you to use an on-premise build server, even if you have (like me) source in TF Service. If the build fails, it is possible to remote desktop on the build machine, verify the exact command line used to call your utility and fire the very same command line from a command line or a Visual Studio debugger to understand what went wrong.

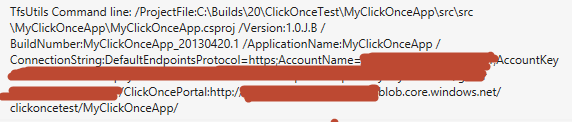
Figure 10: Exact command line used by the build.
This (http://sdrv.ms/13ndrdK) is the link to the zip that contains both the command line utility and the Customized Workflow for TFS Build. Feel free to use and modify it for your need.
Gian Maria.