The ability to automatically deploy a site on Azure Web Site from TFService is really interesting, but sadly enough there is no out-of-the-box solution to update the structure of an Azure Database with a VS2012 Database Project. In this post I’ll show how to modify the standard build template to deploy a Database Project during Azure Web Site Deployment. I’ve blogged in the past to explain how to Deploy a Database Project with TFS Build, but that post refers to the old type of Database Project (VS2010) and now I want to explain how to customize the AzureContinuousDeployment build to deploy on azure a database project of VS2012.
First of all create a copy of the standard build file in BuildProcessTemplate directory.
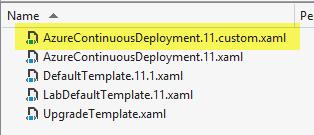
Figure 1: Create a copy of the original AzureContinuousDeployment.11.xaml file and check-in
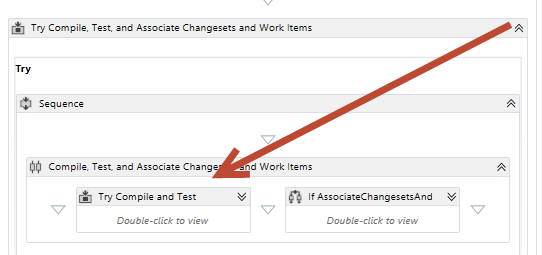
This will avoid messing with the original build definition ; to accomplish it simply create a copy of the file in your workspace, check-in the new file and open your local copy from Visual Studio to modify the Workflow definition. The main problem if you are not familiar with TFS Build Workflow, is to find the place where to put the new instructions. To help you locate the point where you should modify the build file, please look at Figure 2, that shows where to locate the Try Compile and Test sequence.

Figure 2: Try Compile and Test is the part of the workflow you need to modify.
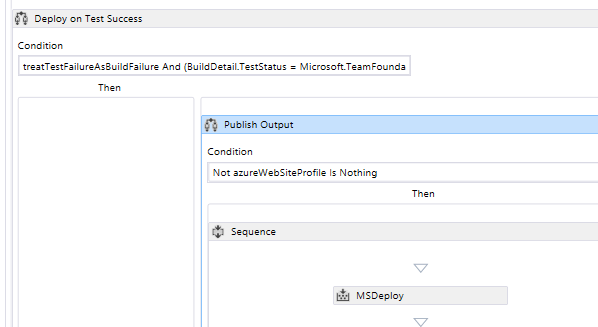
Now you should expand Try Compile and Test, scroll down until you find a sequence called Deploy on Test Success, expand it and you will find a Publish Output sequence where you can find a call to a MSDeploy action that actually is deploying the web site.

Figure 3: The point of the workflow where the site is deployed
The right place where to insert additional operations to deploy some stuff is right after the MSDeploy.
First of all you should add a couple of Arguments to the Workflow to make it more generic and make it reusable; with arguments the user will be able to specify if he want to deploy a database (DeployDatabase argument) and the Database Output File Name (DatabaseProjectOutputFile) directly from the build editor. This will permit you to keep only one xaml file with the build workflow, and have multiple build, based on that workflow, and choose for each one what database to deploy. You should also configure the Metadata property to specify Name, description and other properties of your custom arguments. You can have a look at TFS2010 Create a Personalized Build post for details about Metadata and Workflow Arguments.
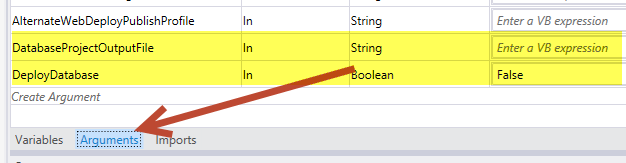
Figure 4: Add a couple of arguments to parametrize the workflow.
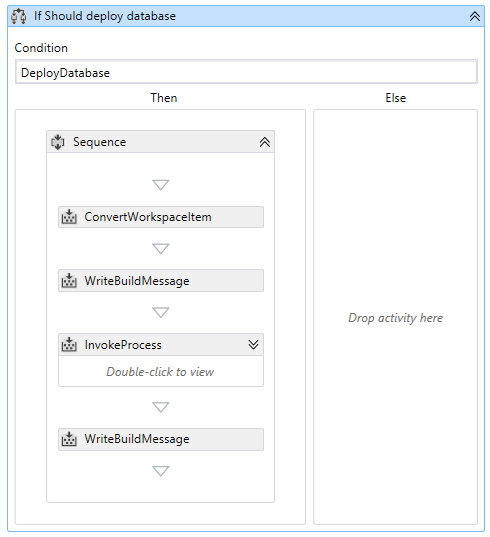
The whole customization is represented in Figure 5 and you can see that it is really easy. You start adding a condition to verify if the argument DeployDatabase is true, name this condition If Should Deploy Database , and then add a standard Sequence inside it in the thenarea. If you exclude WriteBuildMessage actions, that are merely logging, the whole operation is done by only two Actions.

Figure 5: The sequence added to the standard workflow to deploy a database project.
The ConvertWorkspaceItem is used to convert a path expressed in TFS source control (starts with dollar sign) to local path of the build server. This is needed because to deploy a database project the easiest path is using SqlPublish.exe program, (installed locally in your developing machines when you install Sql Server Data Tools). I’ve simply located them in my HD, then copied inside a folder of the source control to have it included along with the source code of my project. This technique is really common to achieve Continuous Deployment, if is it possible, including all the tools needed to build and deploy your solution should be included in the source code of the project.

Figure 6: Insert all SqlPackage.exe distribution in your source code and check-in, this will make the tool available to the Build Agent
This is the easiest way to have an executable available for build agents. When the agents starts the build it does a get latest before compiling the source and this will automatically get tools to deploy database along with the source code. This technique is really useful for TF Service because you have no access to the elastic Build installation, and you have no way to install SqlPackage.exe in the Build Server. (Note: If you have your Build Agent on premise, you can simply install SqlPackage.exe, then find the location on the hard disk and simply hardcode (or add another variable) installation path in the build definition and get rid of the ConvertWorkspaceItem action )
The ConvertWorkspaceItem action is needed because I know the path on the source control Es: $/myproject/trunk/tools/Deploy but I do not know where the Build Server is creating the workspace to build the source. The ConvertWorkspaceItem is the action that permits me to convert a path on source control to a real path on disk. Configuration is represented in Figure 6 
Figure 7: Configuration of the ConvertWorkspaceItem.
This is the configuration of the ConvertWorkspaceItem action and the Input path is composed by Workspace.Folders.First().ServerItem variable, that represents the first mapped server folder on the workspace used to build the solution. This is a convenient way to make the build file reusable, as long as you remember that the first folder to map should be the top level folder of your project (trunk, or specific branch), and it should contains a folder called /Tools/Deploy/SqlDac that should contains the SqlPackage.exe distribution. The result property point to a Variable of the workflow (I have previously declared), that will contain the physical location of the SqlPackage.exe tool after the execution of the action.
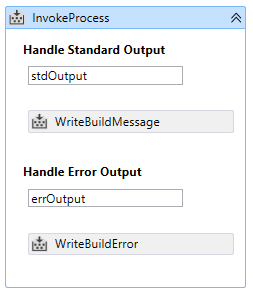
The other interesting action is the InvokeProcess used to invoke the SqlPackage.exe tool to deploy the database. You can customize the build with custom action, or msbuild scripts (I’ve talked a lot about it in the past) but the easiest way is to include an executable in source control Tools directory and have it invoked from InvokeProcess. This solution does not require deploying custom assemblies, and is really simple to setup. If you expand it you can find that this action have a couple of slots to place an activity that will be invoked with the standard output and the standard error, usually you have them setup as in Figure 8. The WriteBuildError activity is really useful because it write error message on the build log, and it makes also the build as Partially Failed, so if the database deploy operation fails, I have automatically my build marked as partially failed without the need of any other further customization work.

Figure 8: Intercept standard output and error and have them dumped as build message
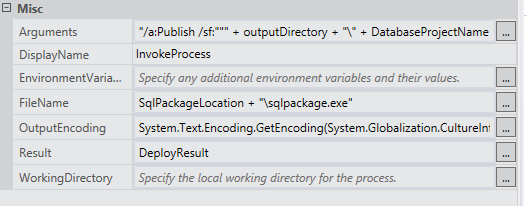
This is the complete configuration of the InvokeProcess action.

Figure 9: Configuration of the InvokeProcess activity
Actually the interesting part is the FileName property that use the SqlPackageLocation variable (populated by ConvertWorkspaceItem) to locate where the agent downloaded SqlPackage.exe and the Arguments that contains all the info for the deploy. Here is its full value.

Figure 10: Configuration of the Arguments property, it contains the full command line arguments for SqlPackage.exe tool
The cool part is the ability to use the variable azureWebSiteProfile.SqlServerDBConnectionString that contains the database connection string extracted from the publish file, it was parsed for you by AzureContinuousDeployment build. The outputDirectory variable is the directory where the build copied all the output of the various project after the build, and is the location of the.dacpac file of your database project. Finally you can check-in modified workflow back to TFS.
Now you can let azure create a standard Build for you, with standard configuration from Azure Management portal, this will create a build in your Team Project. Once the build is created, you can simply edit to use new Build Workflow. As first step you need to change the workspace in Source Settings, because you need to map the entire trunk (main) directory, because you want Tools to be downloaded with source.
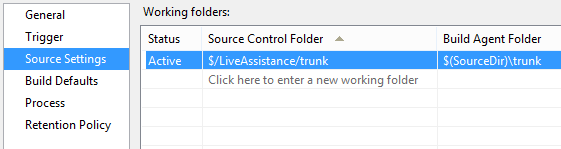
Figure 11: Change configuration of the workflow, map the entire trunk of the project to include the Tools directory
Finally you can go to the Process section so you can change the workflow, from the standard AzureContinuousDeployment to the one you customized with previous steps.
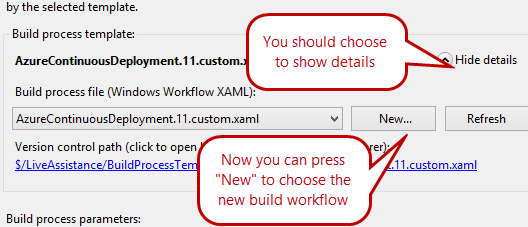
Figure 12: Choose the new Build workflow for the build
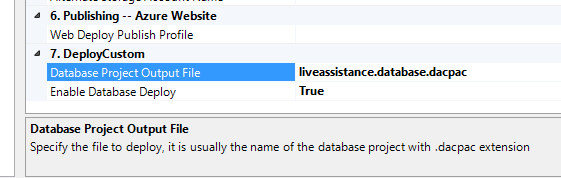
Now you should see in all variables added in Figure 4 , if you correctly filled metadata for them, you should see description for them. I also created a new area of configuration called DeployCustom to separate all standard build properties by new ones introduced by the customization.
Figure 13: Specify values for your custom variables
Now I can proceed to set Enable Database Deploy to true and specify the name of the dacpac file I want to deploy. Name of dacpac file 99% is the name of the database project followed by the.dacpac extension.
Now at each Build the Azure database connected to the Web Site would be updated to the new structure of the database project.
If you prefer You can download the modified build definition file from Herebut I strongly suggest you to modify your file. First of all because the original publish file can be updated from the time this post was published, but it is also important that you try to being familiar with build customization, so you will be able to further modify it if you need to deploy other stuff.
Gian Maria.