Now that with Update 2 we have Git support on TF Service a standard question arise: “how can I move all source from a TF Service standard project to a TF Service Git based Team Project?” The answer is quite simple
First of all you need to install and Configure Git-Tf, an addin that permits to clone a TFS source control in a local Git repository, this is needed to have a full local clone of the source project you want to migrate. Then you need to create a new Team Project in TFService that is based on a Git repository.
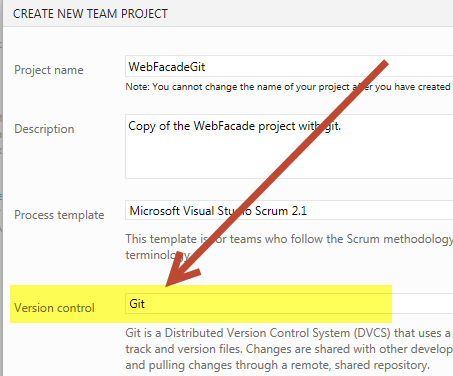
Figure 1: Create a new team project with Git as a Version Control System.
Now you need to create a local clone of the original Team Project thanks to tf-git, just open a Git Bash console in a folder of your choice and type the command
git-tf clone –deep https://gianmariaricci.visualstudio.com/defaultcollection $/webfacade
Pay attention to use the –deep option to clone all check-ins of the original TFS repository, you now will be prompted for credentials and the clone operation will begin. I strongly suggest you to Enable Alternate Credentials to connect to your TFS so you can use a standard username/password combination to connect to your TFS Account. Now you can move into the new folder that will have the same name of your TFS Project and you should see all your original check-ins cloned in a local git repository.
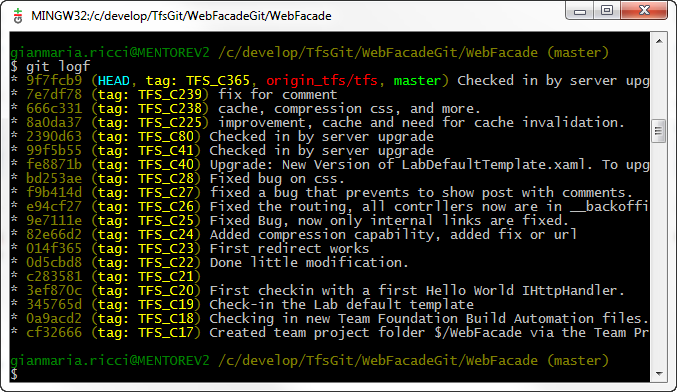
Figure 2: after a git-tf clone –deep you now have a local git repository with all original check-ins
Now you can work locally with git and use a standard TFS Version Control System thanks to the git-tf, but since now TF Service has support for standard Git enabled Team Projects, you can push all commits to the new Team Project just created in Figure 1 and start working with Git.
To accomplish this you can simply set the remote for this repository to be able to push and pull changes from your new TeamProject running the following three commands.
git remote add origin https://gianmariaricci.visualstudio.com/defaultcollection/_git/WebFacadeGit
git fetch
git push origin master:master
The url of the git repository is the standard url for your TF Service project collection https://yourname.visualstudio.com/defaultcollection followed by the /_git/teamprojectname part that identifies the git repository. The git fetch command will be prompt for password and is used to contact the remote repository and fetch modifications. In our situation we do not have any modification since the repository is empty so nothing happens except you contact the remote server and verify if the remote was set correctly. Finally push command will force the local master branch to be pushed to the remote master branch (and it implicitly creates remote master branch if it does not exists because the repository is empty).
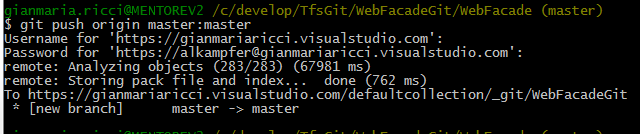
Figure 3: Push command creates the remote master branch and pushed all local changes to TF Service Git repository
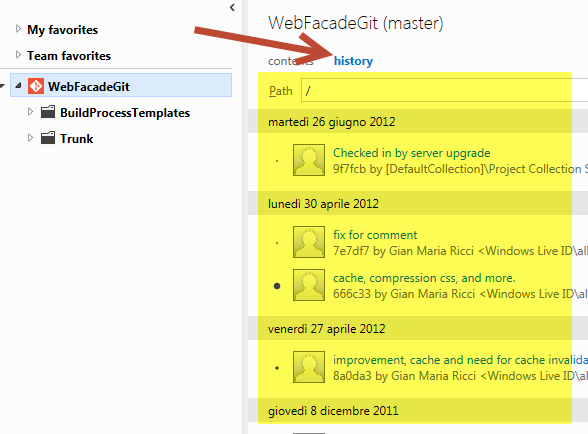
The result is the creation of a new branch in the remote TF Service git enabled project, and you should now be able to see all the commits from the web interface.

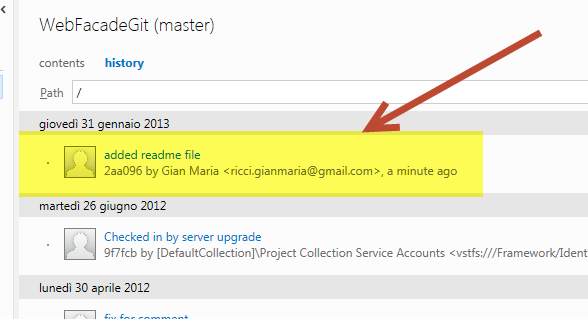
Figure 4: As result of the push, all original check-in into the original project are now standard git commit in the new repository
Now you need a final git command to setup the remote branch as the default upstream of your local master branch git branch –set-upstream master origin/master
This command will setup the default connection with your new TF Service Git enabled project, now you can start to work normally with Git. As an example I added a readme.txt, committed locally and finally issued a simple “git push” and, voilà, you have done the first push of modification to Git repository in TF Service.
Figure 5: The git push operation pushed modification to the upstream TF Service Git server
To read how to work with Git and the new CTP Visual Studio plugin I suggest you reading this post.
Gian Maria.