The approach to Design Time data shown in previous post is really quick and useful for simple View Models, but in complex application it starts to have some drawback. One of the main problem is remembering the exact syntax to declare object in XAML; when View Models became complex you start to have ObservableCollection of sub ViewModel type, and maintaining design time data can become problematic. The other drawback is that if you rename a property of the viewmodel and you forget to change corresponding design time data, it definition will become invalid.
There are also situation where you cannot use a XAML definition of Design Time data efficiently, because of the MVVM architecture. Suppose a typical scenario where you want to be able to filter a list of objects in MVVM entirely with declarative binding, the easiest solution is the following.
| |
If you are interested in the pattern behind this piece of code you can read this post that explains how this structure works. With this pattern you should bind the UI element (Ex, a listview) on the Logs property, but since this is a ICollectionView you are not able to declare design time data in XAML. The real collection is usually private and also this pattern requires some code to work because you need to initialize the CollectionViewSource, etc etc. This is usually a big problem, because it greatly reduces the ability to design a good interface for collections of elements. The ability to completely declare in XAML your ViewModel has a limitation because XAML is a simple representation of the serialization of an object so you cannot create a valid ICollectionView with objects inside.
The solution to this problem is quite simple, because you are not forced to use at Design Time the very same class you will use at Run Time, it should only have the same property names. This is the power of WPF binding, if you bind a control of the UI to a property of the DataContext, it does not care of the real type. Lets see how we can use this fact to have a good design experience without the need to use a XAML file to declare an instance of your ViewModel.
This approach to design time data uses another class that inherits from the real View Model so you can populate Design Time data in constructor with standard C# code.
| |
This approach is simpler, because you are not forced to remember obscure XAML syntax to fill properties of ObservableCollections and you can also leverage all your knowledge and the power of C# to create meaningful design time data. In the previous snippet of code there are a couple of stuff that worth mentions. First of all this object declares a property called Logs and thanks to the keyword it hides the original property of the ViewModel with the same name. This “hiding” property is of ObservableCollection<LogMessageViewModel> type, so it can be populated easily with code. Thanks to this trick you are able to populate Logs property at design time, while at Run Time Logs property is the one declared in the base class, the binding will work but we are able to use Design Time Data. Using this class as design time data is really straightforward, just declare an instance in XAML and the game is done.
| |
The other interesting aspect, is the cycle used to populate Lists collection because with simple string manipulation it creates a log for each allowable level, so it will represent all six logger level (OFF, DEBUG, WARN, INFO, ERROR, FATAL). This is the power of using a concrete class for Design Time Data: you can use C# to generate data and you can also use libraries as NBuilder to quickly generates meaningful sample data. Once everything is in place you can simply bind a control (Es datagrid) to the Logs property, design time experience is the very same of the previous example.
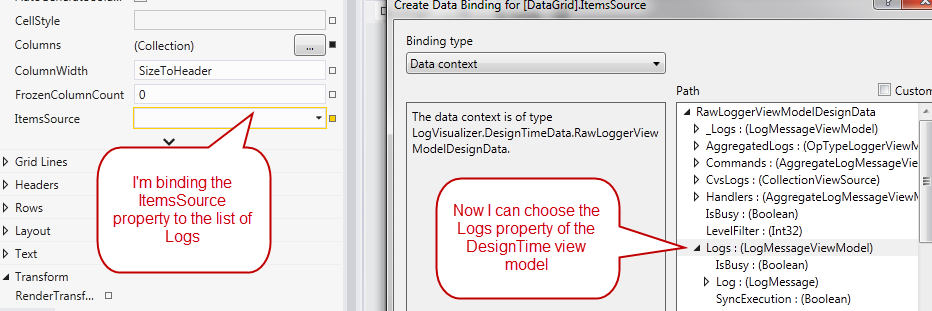
Figure 1: Design time data experience is the very same of using XAML Design Time Data
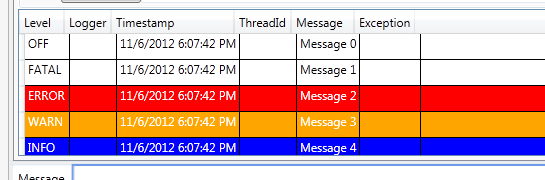
You are actually binding to the property of the Design Time View Model, but this is not a problem, at run time the Logs property will resolve to the property of the base ViewModel of ICollectionView type, and everything will work as expected. Now I can format the grid and I want the background color to reflect Logger property of the log, because I want all error message to appear with red background, info with blue background and on. To accomplish this a data trigger is the perfect solution
| |
Thanks to the fact that I’ve generated a log for each Level property, I’m able to have an immediate feedback on how my UI will looks at runtime for each level type.

Figure 2: Immediate feedback of the UI thanks to design time data
Working this way is really productive because you have an immediate feedback of how the UI will like and generating sample data is really easy, since you can use C# syntax and you can hide base class property if some pattern makes some property unusable at design time.
Alk.