With Guardian we were investigating about a strategy to validate business entities in a project we work into. You can find a lot of examples around the web on how to use validators, but most of them deal with basic textbox, and property validation stuff. What we need is the ability to use a validation framework on a business entity or dto returned from a service,without adding properties to those objects. Basically we have a library with a set of rules that can tells us if an object is valid or not, and give us a list of errors, the aim is to validate a whole object while the user is editing single properties.
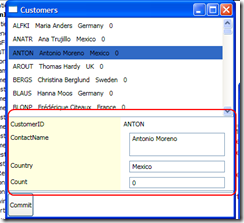
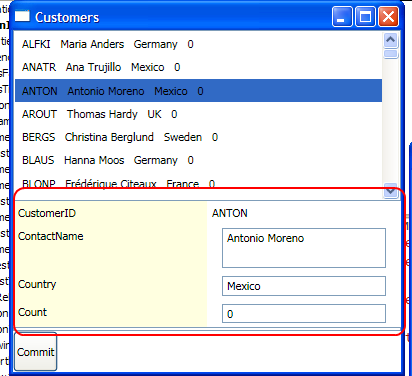
The solution lies in a new introduction of 2008 SP1 the BindingGroup. In the example I simply create two controls, the first is responsible to show a list of customers, the other is responsible to edit currently selected customer. My goal is having the possibility to validate a Customers instance, showing the list of errors to the user, and change some visual appearance of the control to better signal the error. All those requirements must be satisfied without adding properties related to validation in Business Object instances. Here is the appearance of the control with everything is ok
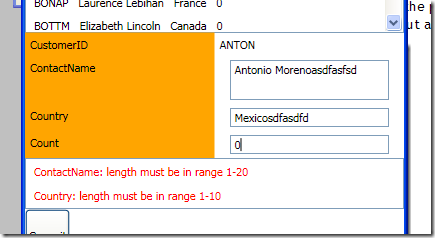
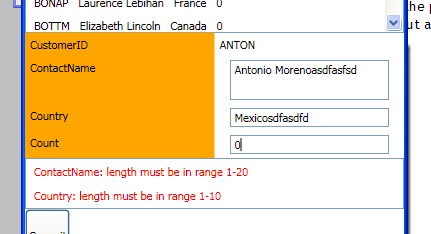
Then I have some rule for properties length, if I change strings with too long values the validation fails.
As you can see I have clear indication of all errors, and at the same time a rectangle under the labels will change the fill from lightYellow to Orange to help the user to visualize that something is wrong. Ok let’s see how we can reach this solution. First of all here is the validator for the businessEntities
| |
As you can see I use a custom validation library, in this example I simply set all rules inside the validator static constructor, in real scenario I can use attributes or xml configuration files. The important stuff is that I have an object called Validator that is able to validate business entities. In the Validate function I cast the value to BindingGroup, then check if I have one item to validate. Since my validator can validate every object, I simply validate the bindingGroup.Items[0]. If the validation fails, I return ErrorMessages property that is a simple list of strings, where each one is a message for a failing rule. Now is the time to go to xaml, here is the declaration of the grid that contains all other controls.
| |
Two things are important here, first I redefine the ErrorTemplate of the Grid, so I get rid of annoying default red border used for controls that fails validation. Then I create a simple BindingGroup, set the ValidationStep to UpdateValue, this means that I’m asking to validate the object after the properties are update with the binding. Then I simply declare the rest of the controls as usual, the only important stuff is that with BindingGroup, validation must be done explicitly, so I need to react to some event of the textbox, the TextChanged is quite good.
| |
As you can see I used the TextChanged event to call the TextBox_TextChanged method
| |
To make validation happens you must simply call the CommitEdit() method on the BindingGroup object. This calls the BusinessEntityValidationRule Validate Method, thus validating the entire object. Now the only stuff that remains to do is to react to validation errors. First of all I want to show to the user All the errors that occurred during validation.
| |
I used a simple list view, I bind the ItemsSource to the ErrorContent of the Grid, since I know that the ErrorContent is a list of String, I can simply show each error with a simple label. When there is no errors the listView is empty, when there are errors they are immediately shown with a series of red label. The last stuff is changing the background of the rectangle under the label from yellow to orange.
| |
This is equally simple, because I use a simple DataTrigger to change the fill from LightYellow to Orange when the property (validation.HasError) of the main grid is True. Remember that Validation.HasError is an AttachedProperty and to use it in a binding you need to surround with parenthesis.
The final result is that I can validate the whole object as once, I do not need to insert anything related to validation in the business objects, but everything is done into the validator. Thanks to BindingGroup I’m able to trigger validation whenever I need (textchanged, lostfocus, etc), and I can react to validation error showing details for each error, and changing visual appearance of the control.
Alk.
Tags: WPF Validation