Since a lot of people use NUnit testing framework, it is of high importance knowing how to fully integrate nunit test runner inside a tfs build. The overall problem is that you can create a custom task, or using an existing one to run nunit tests, but the main problem is integrating nunit output with standard tfs output. The problem and a possible solution is described here.
This means that someone had already solved this problem for us :), and created an xslt that transforms a nunit-style output into a mstest-style output (.trx file), you can find the xslt and an example proj in the nunit4teambuild codeplex project.
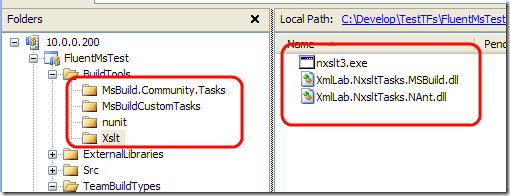
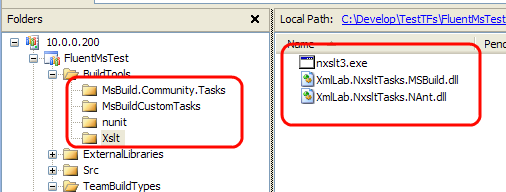
The only things you should do is to include all needed file in the source control of the project, to make them avaliable to each build. (Note: in the project site the author ask you to download the nxslt2.exe xslt command line tool, the link appear to be broken, so you can download an update version here).
Now that everything is in place we need to extend the build process including nunit tests and publish results in the team foundation server.
| |
To extend the build you need to override the AfterCompile target, then with the BuildStep you creates another build step that will be visualized in the build result window. The BuildStep is a predefined task of msbuild, and has an output property called Id, that must be stored in some properties to close the step once testing phase will finish. Then you must create the list of the assembly that contains nunit test to be run, now it is possible to use the nunit task taken from the community task project.
| |
The task is really simple, you need simply to specify the list of the assemblies, the output file you want and the path of the nunit test runner, that I included in the source under the BuildTools\nunit folder. As I told before, having all tools you need for the build in the source repository is handful, because you can avoid deploying them in the build machines. After tests are run it is time to set the status of this step to success or failure depending on the outcome of the test result
| |
Thanks to the Condition attribute, you can set the Status of the previously created BuildStep to Succeded or Failed depending on the content of the property NUnitResult. Now it is time to transform the result file from xml Nunit file format to trx format, thanks to the trasfromation sheet.
| |
The final step is calling mstest to publish result trx file to the TFS server, and associate it with the actual build.
| |
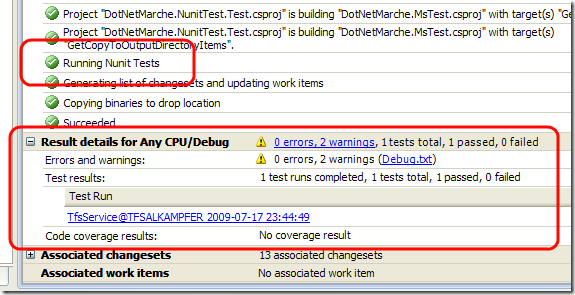
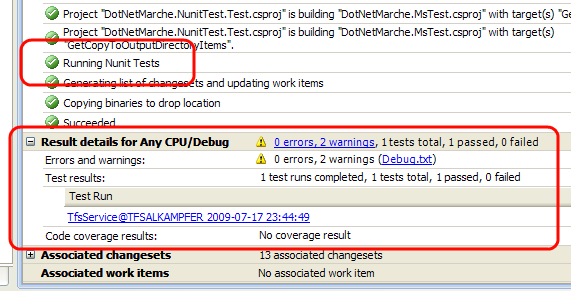
This is a simple Exec towards the mstest.exe executable, that is able to take a trx file and publish to TFS. Here is the result.
As you can verify nunit tests are executed correctly, and results are correctly published in the TFS build result window. Thanks to BuildStep we created a step that states Running Nunit Tests, and thanks to mstest.exe and xslt transformation we transformed the result from nunit output to mstest output, so we can publish them into the tfs build.
alk.
Tags: Team Foundation Server Nunit