In previous post I explored the many advantages I’ve found using GitHub codespaces to author blog posts directly in a browser. That example was surely too simple, after all a hugo blog is just markdown, but nevertheless Codespaces allows me to configure my environment with great easy.
You can follow the guide on the official link but here is a quick summary on how I configured my codespaces for my blog. First of all you can directly add a configuration file inside codespace

Figure 1: Adding Codespace configuration file inside Codespace*
This will add a devcontainer.json file inside a .devcontainer special folder, you can now simply modify that file to configure your environment. Typically you start specifying the list of Visual Studio Code extension you need as well as all the settings you want. Here is an example:
| |
This is really important because each contributor to the repository, will find a pre-configured Codespace environment that is already ready to be used. This is a killer feature for productivity, because GitHub will provision an entire environment ready to be used in just a single click.
For all of you that wonder how can I found the id of extension to put in the file the solution in simple, just use Visual Studio Code to grab the id of already installed extension and the game is done.
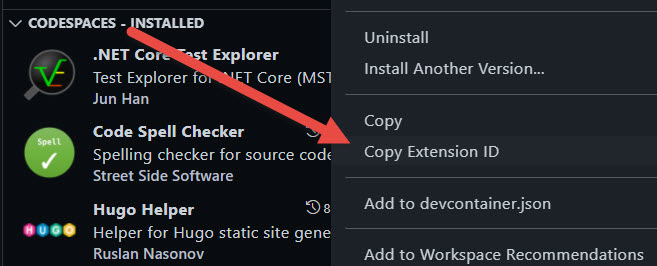
Figure 2: Find the id of the extension directly from Visual Studio Code
As you can see in Figure 2 you can just go to the extension tab, then click the gear icon near the extension to visualize a menu that allows you to copy the id of the extension to paste inside devcontainer.json configuration file.
With a few click you can configure all your favorite extension inside your Codespaces configuration file
You can do the very same for setting, if you personalize any settings, like font size, you can simply go to setting in Visual Studio Code, change the value, and click on the gear icon to copy the configuration as JSON. Copied value can be directly pasted in the settings section of devcontainer.json file.
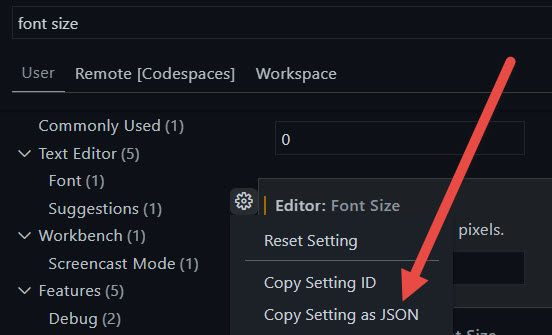
Figure 3: Copy id of any configuration for Visual Studio Code
Once you have configured everything you can also configure which packages you need to use in your Codespaces environment, in my situation I just need to have the npm package hugo-extended installed in my environment. While all the configurations related to Visual Studio Code are contained in devcontainer.json, .devcontainer folder contains also the full Dockerfile used to build the container.
You can configure not only Visual Studio Code, but also the full Docker image used in your Codespace
You can now modify dockerfile to configure everything you need at container level, like packages, npm packages and so on. If you started choosing a container for Node development you already have some commented code in generated Dockerfile that shows how you can install globally some npm packages if you need
| |
When you are ready to test your new configuration, you can just invoke the command Codespaces: Rebuild Container and your container will be rebuilt with the new configuration. All your pending changes are preserved and you will find them upon container recreation. If for some reason the container failed to build (such as broken dockerfile) codespaces will start in a maintenance mode, where you can edit configuration, fix the errors and retry container rebuild. All of your modification are preserved even in maintenance mode.
If you really want to use codespaces learning how to configure the environment is the killer feature you need to master, because this will give to every contributor the power to do just one click and starts working in a fully preconfigured environment.
Codespaces will free you to have anything installed on your machine to work in a project
Even in such specific scenario, authoring blog post with hugo, having a good configured Codespaces allows me to be productive with only one click in my favorite browser, from whatever operating system, without the need to have anything installed or preconfigured. This is the real killer feature, I do not need to install anything in my machines, if I reinstalled everything on my machines I do not need to worry to remember what do I need to author a blog post, I can just work from anywhere.
Gian Maria.